Homemade Brown Rice Mochi 玄米もち
Happy Happy New Year! I have this really giddy feeling that 2016 is going to be the best year yet. I suppose that it’s always a matter of perspective, so I guess I’m just going to choose it. This IS going to be our best year yet! And in Japanese fashion, what better way to start the year than with some mochi? Never heard of it? Then I’m glad you’re here, because it is time you are introduced.
Mochi is basically glutinous rice (not to be mistaken with gluten) that’s pounded to death in a giant mortar and pestle-looking thing, and the result is this irresistibly ooey gooey chewy and, when roasted, crispy crust perfect treat. It’s served sweet (sometimes even with ice cream! gasp!) or savory, and is just gloriously versatile.
You can buy dried bricks or rounds of it at an Asian market, and like I said above, they roast really nicely where the outside gets charred and crispy and the inside gets super soft and sometimes even bursts out of the crust and … wait, sorry. I just disappeared there in mochi-dreaming heaven for a second. But, let’s be real here, my blog is about cooking from scratch, looking for a nutritious way to do it, and simplifying it. Afterall, I doubt too many of you have a giant rice-pounding apparatus in your shed, or even a modern mochi-making machine. I don’t. So as I was pondering how to make this at home and make it nutritious, I had a huge lightbulb moment when I thought of trying to pound the heck out of it in my stand mixer. And guess what! It worked really well!
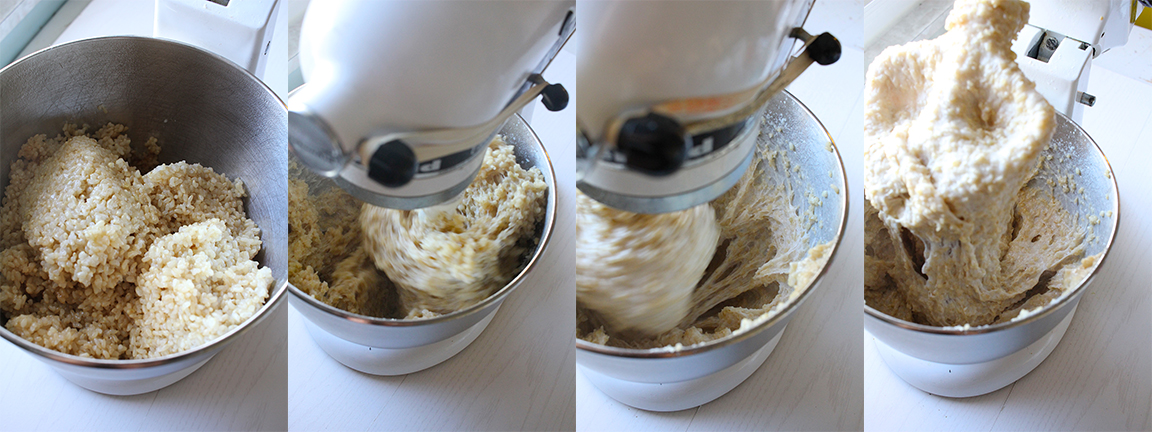
The trick is to get the rice into the bowl of your mixer and get it moving immediately. You want your rice as piping hot for as long as possible to get it to be smooth. As rice cools, it hardens, and that will prevent the smooth texture that we’re going for. Of course, I used soaked brown rice instead of the usual white, so with the whole grain intact, it’s never going to be perfectly smooth. But I quite enjoyed the little bits in my mochi. Oh, and while we’re talking about the rice itself, I should clarify something: you MUST use glutinous rice, often labeled “sweet” rice. This variety of rice is extra sticky, and it’s the only kind of rice you can use to make mochi. Even your typical Japanese short grain rice isn’t sticky enough. I usually buy mine at my local Asian market, but if you have trouble finding it, these Lundberg or Bob’s Red Mill or Ohsawa from Amazon are all great options. (The Bob’s Red Mill isn’t USDA certified organic, so if that matters to you, go with one of the other two options)
So let’s get started, shall we? First, you need to soak your rice overnight, or up to 24 hours. If you don’t know what I’m talking about or how to do it, I go into detail about how to prepare your rice here. Then, once the rice is cooked and still hot (if you’re using a rice cooker, just leave it on the “warm” setting until you’re all set up and ready), dump it all into the bowl of a stand mixer, and beat the rice with the paddle attachment until the grains break down and you have a smooth (with bits of brown rice bran), sticky, kinda gluey-looking mass. It’s not particularly pretty at this stage. It’ll take several minutes, 8-12 depending on how much you’re making. You can use it immediately, but it’s really hard to handle, so I recommend letting it dry out a little first. (Except in the case of … well, I have a surprise coming for you in a couple of days, so be ready. It’s going to be pretty epic.)
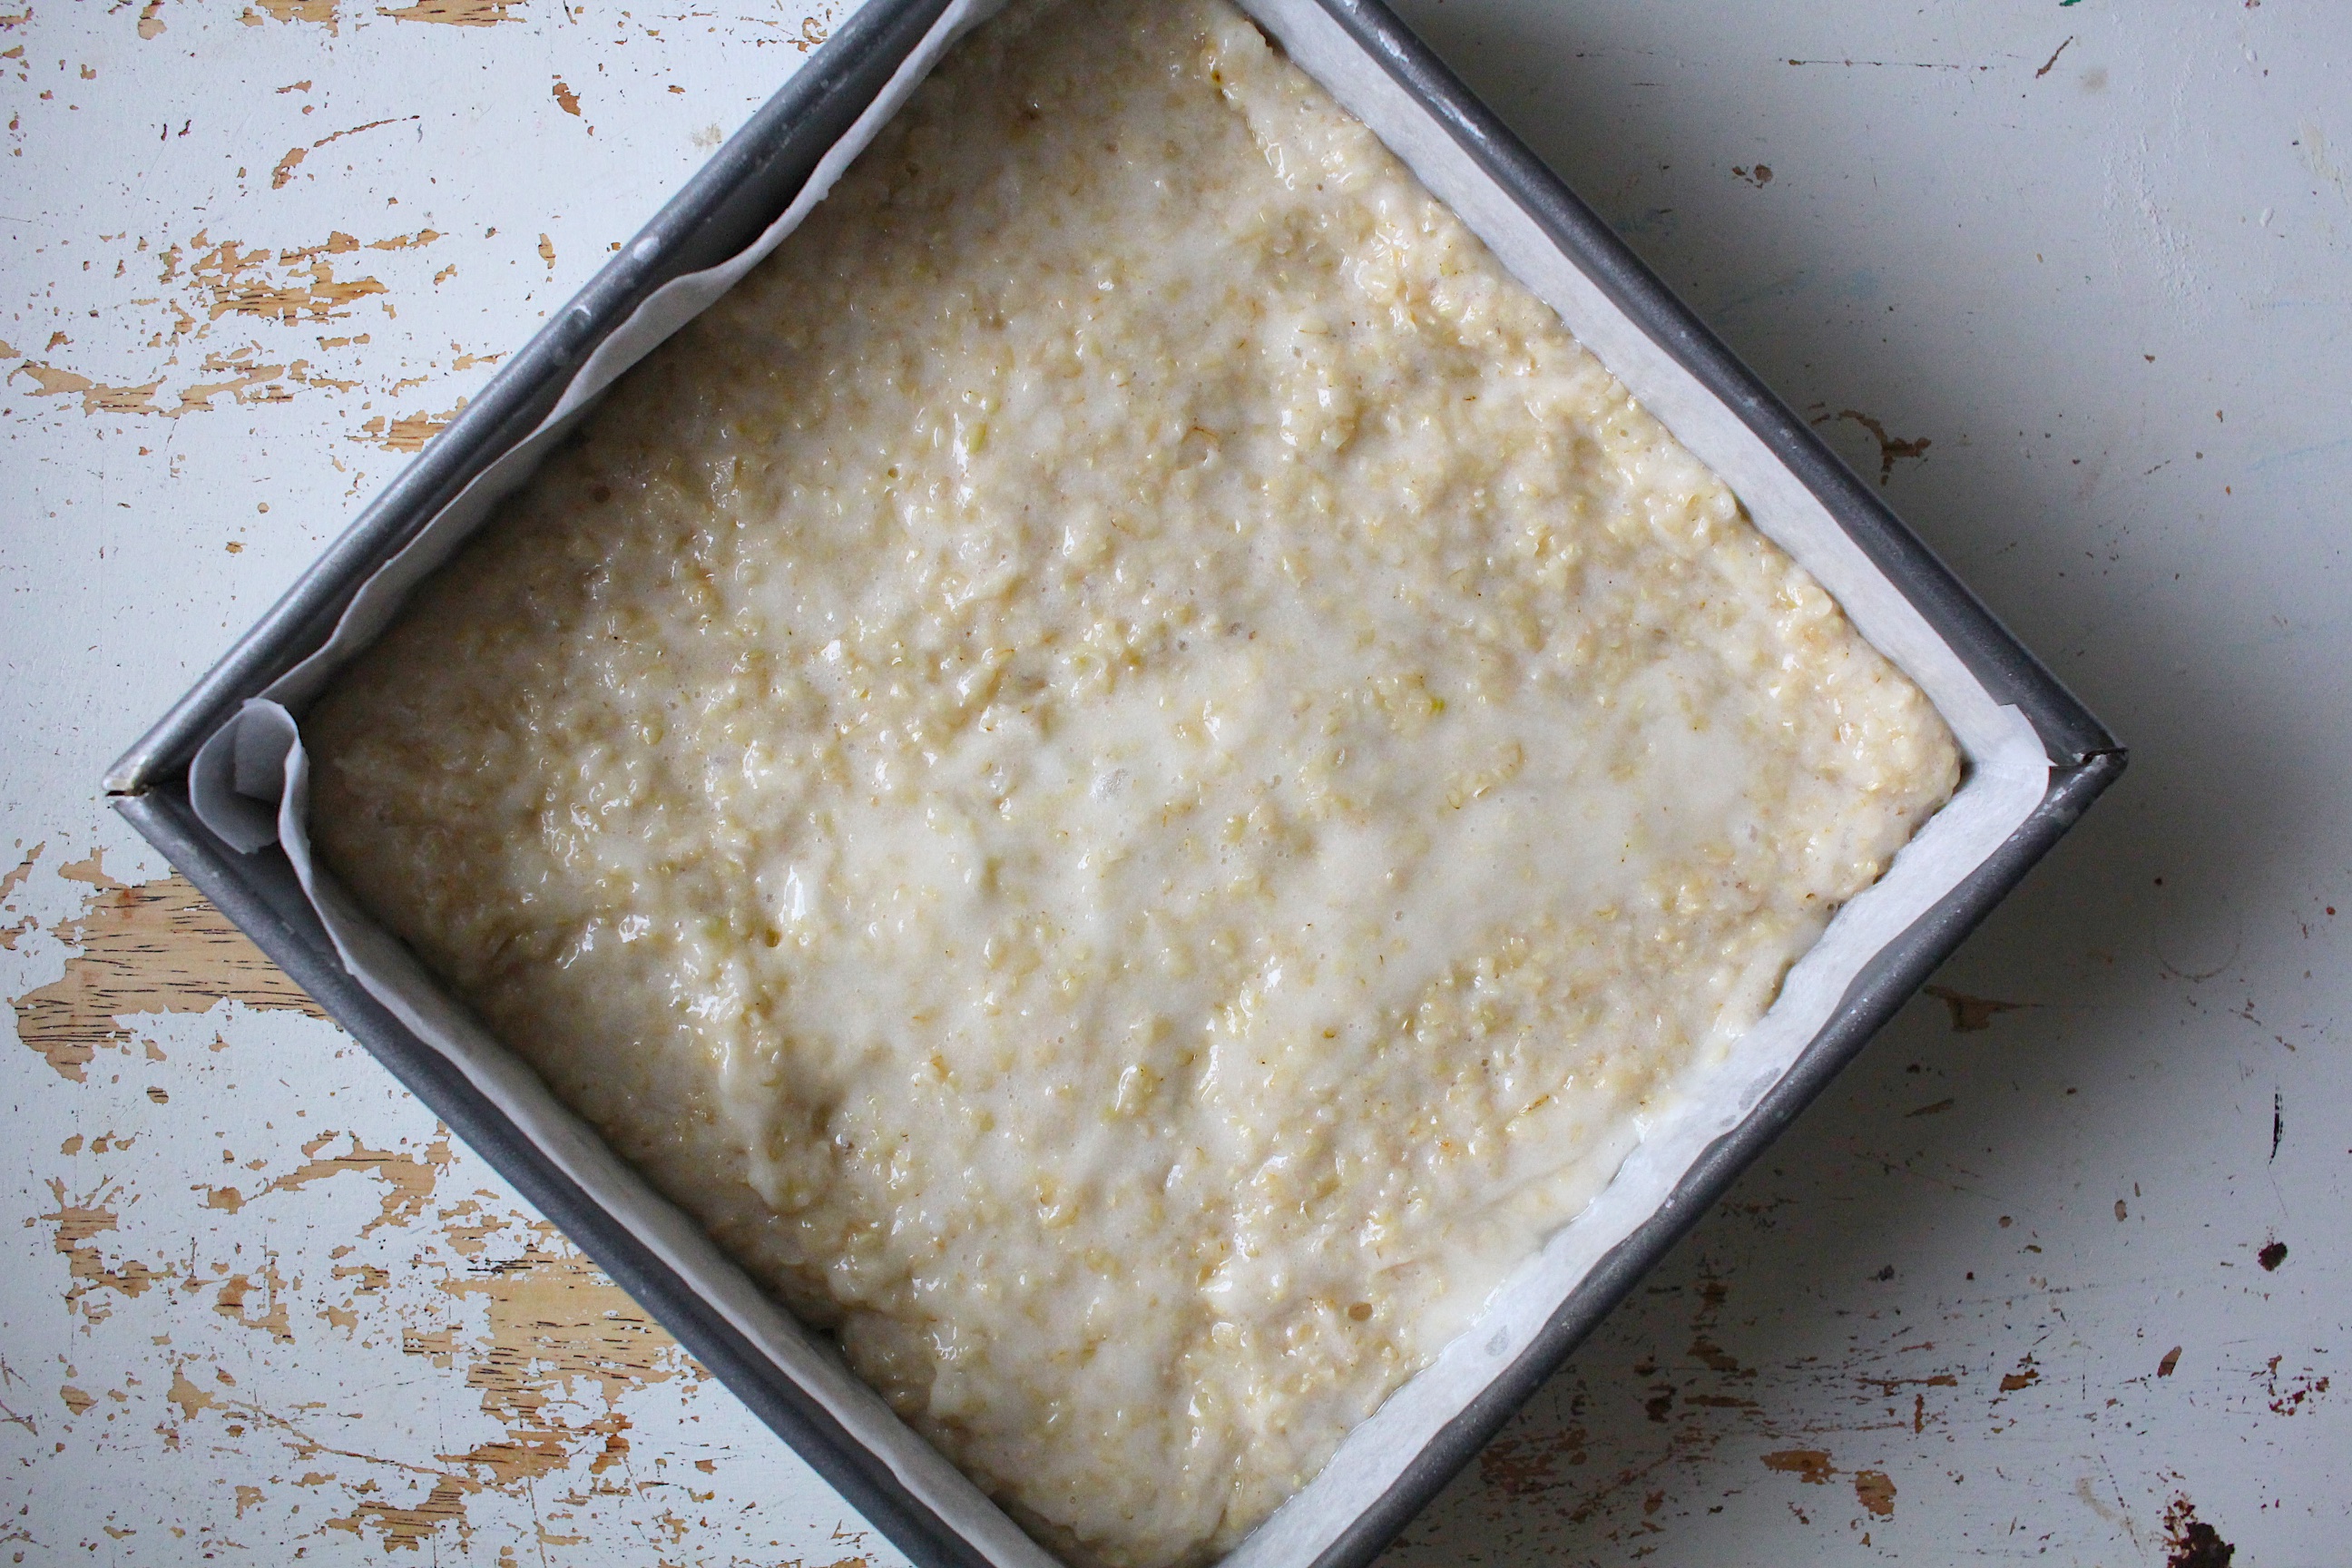
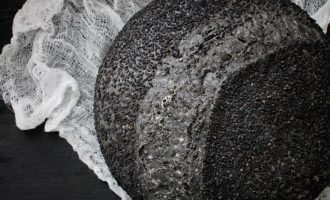
To dry it out in squares, line an 8×8 square cake pan with parchment paper and lightly spray with oil. (I prefer to use non-aerosol sprays, and Target has one I love. I also like to use La Tourangelle. Another great option is this orka oil mister. That way you can choose what you’re spraying) A lot of people swear by starch on the surface, but I always have issues with sticking when I do that, so I go with oil. Once your rice is sticky enough, scrape it out of the bowl (I like to use a dough bowl scraper for this because it’s nice and sturdy and designed to get sticky dough out of bowls) directly into the prepared pan, and with wet hands, press it evenly into the corners to make an even layer.
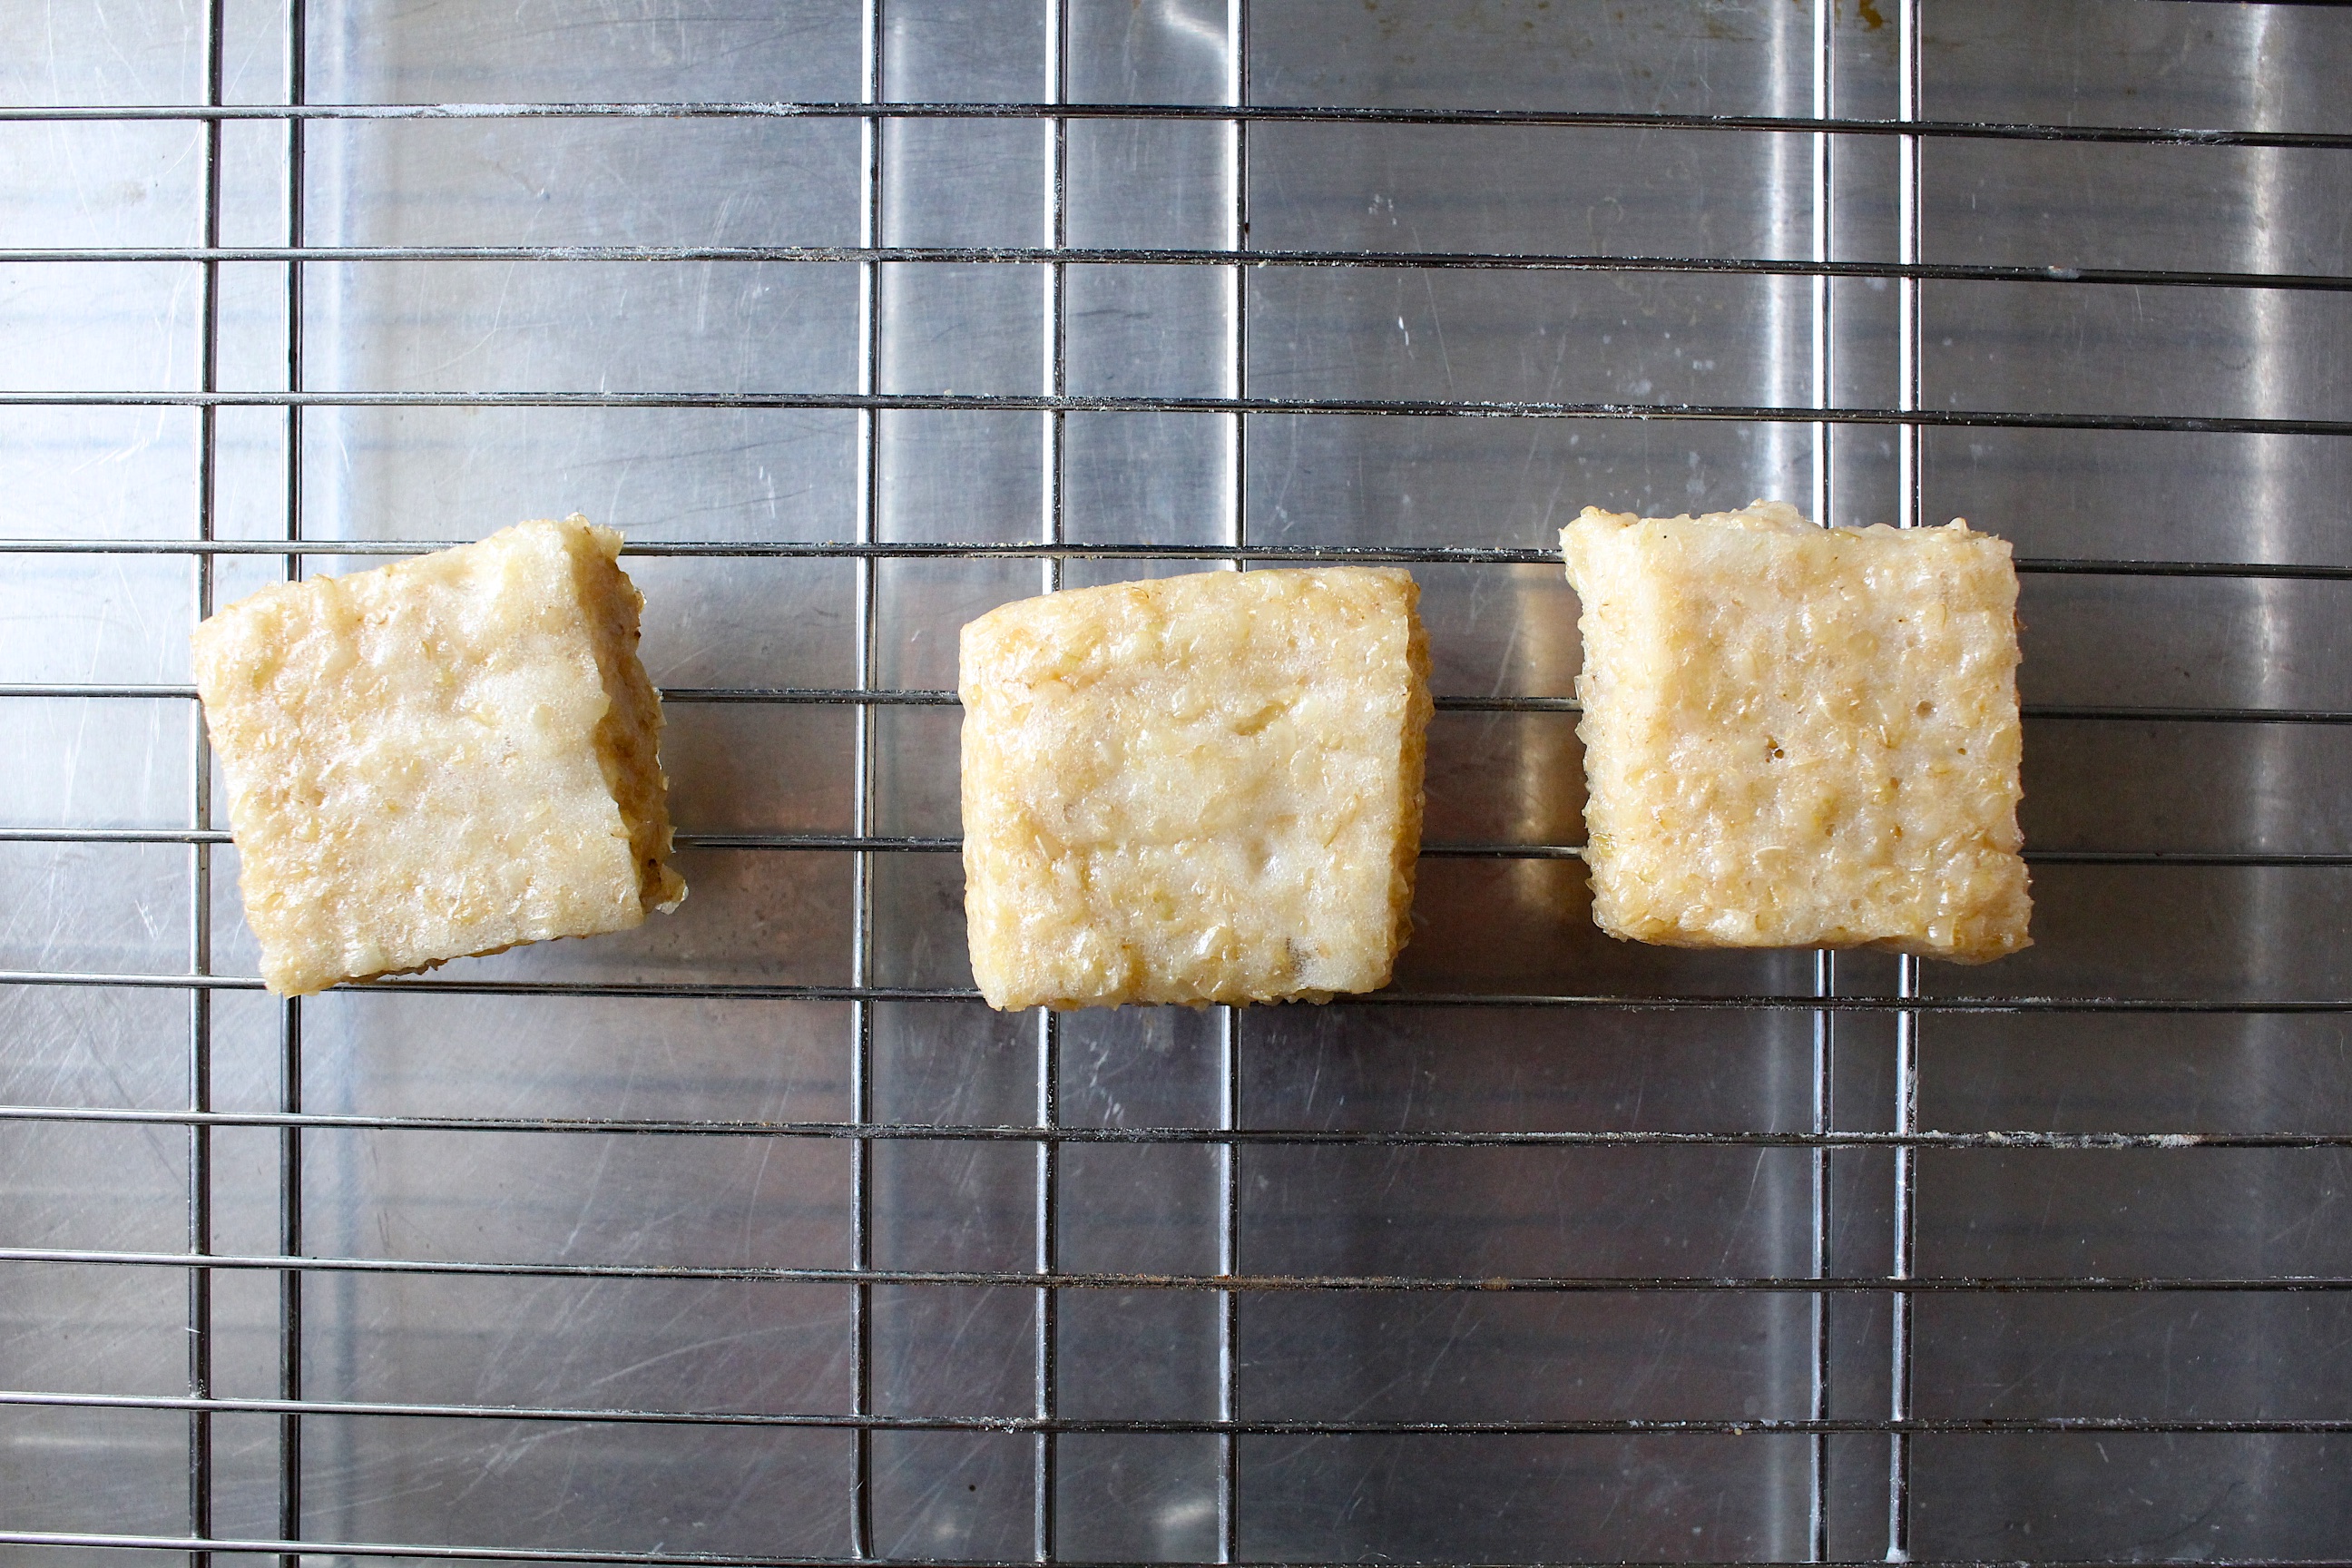
Then you wait for it to dry. Once the top layer is dry enough that it won’t stick to your touch like crazy glue, you can flip it over onto a drying rack and peel off the parchment to let the whole thing dry out a bit. It’ll take up to a day. It’ll still be springy to the touch, but no longer sticky on the surface. (Oh, and the drying rack might leave deep lines in your mochi, don’t worry about that. Just flip it over) At that point you can use a wet knife and slice it into whatever shape you want. I always go with 16 squares: 4 across and 4 down. The smaller the pieces, the faster it’ll dry.
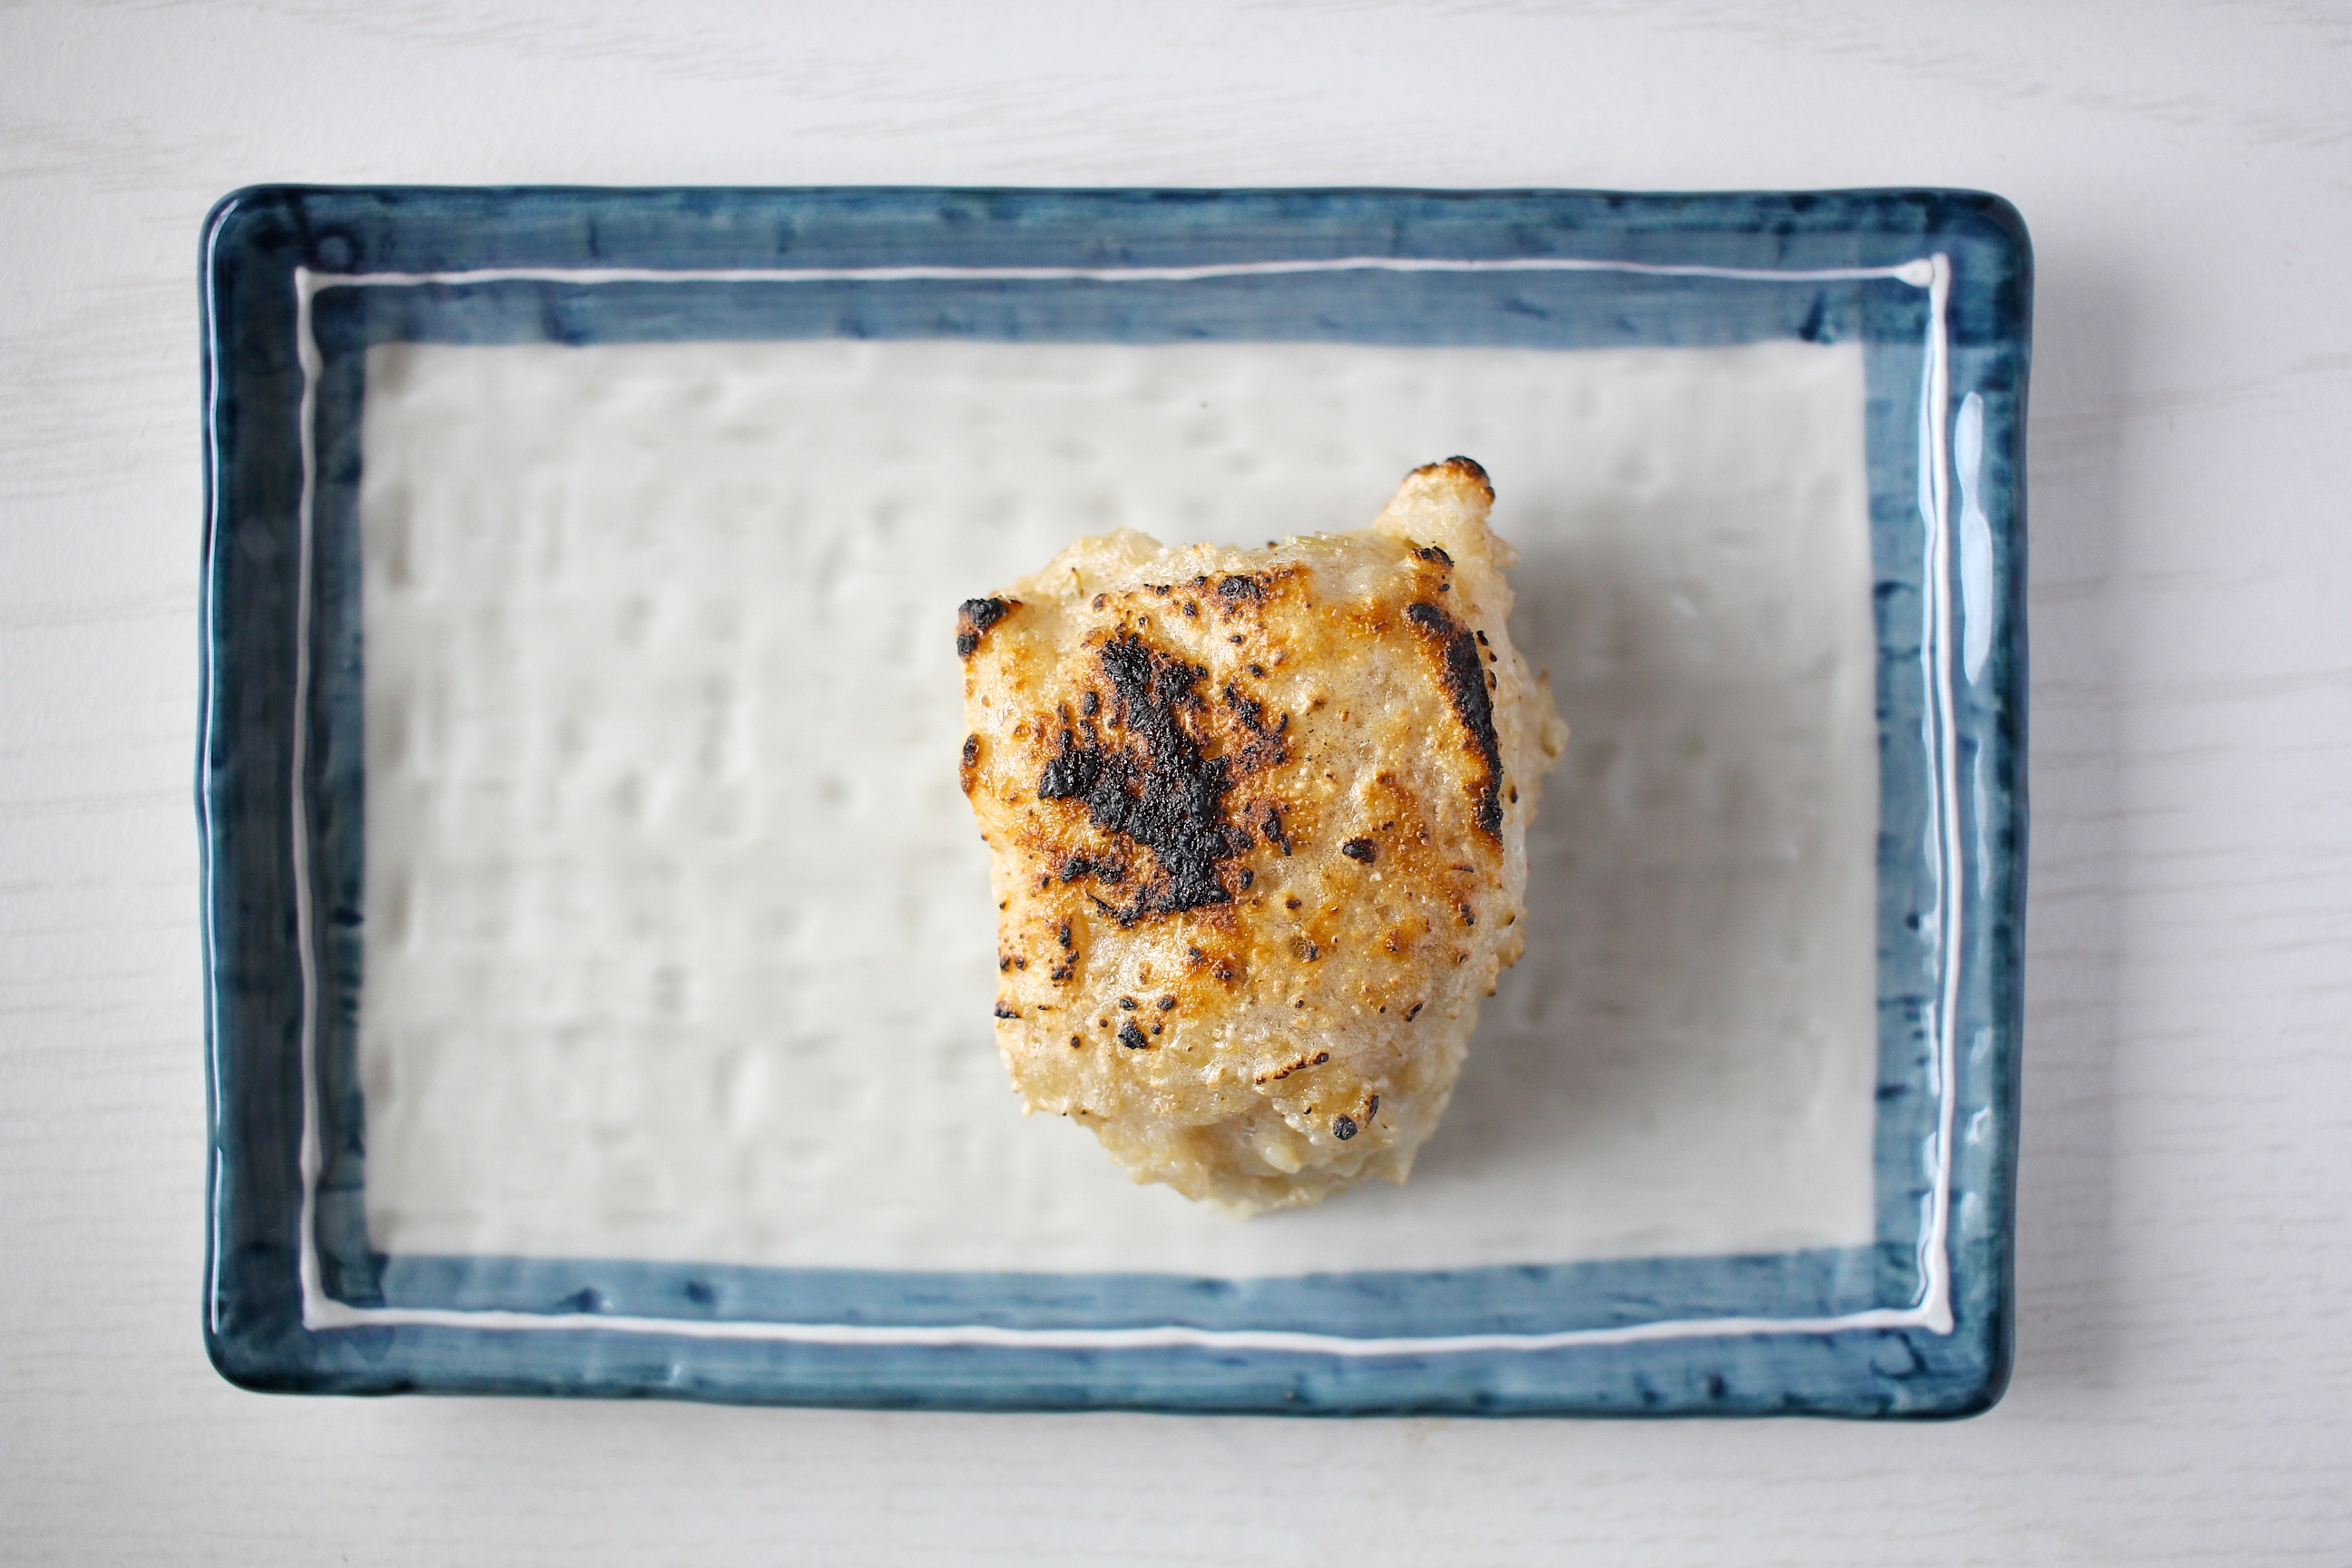
Then you can roast them in a 550°F oven or under the broiler and it forms a crust and then the insides burst and ooze out and seriously, yum.
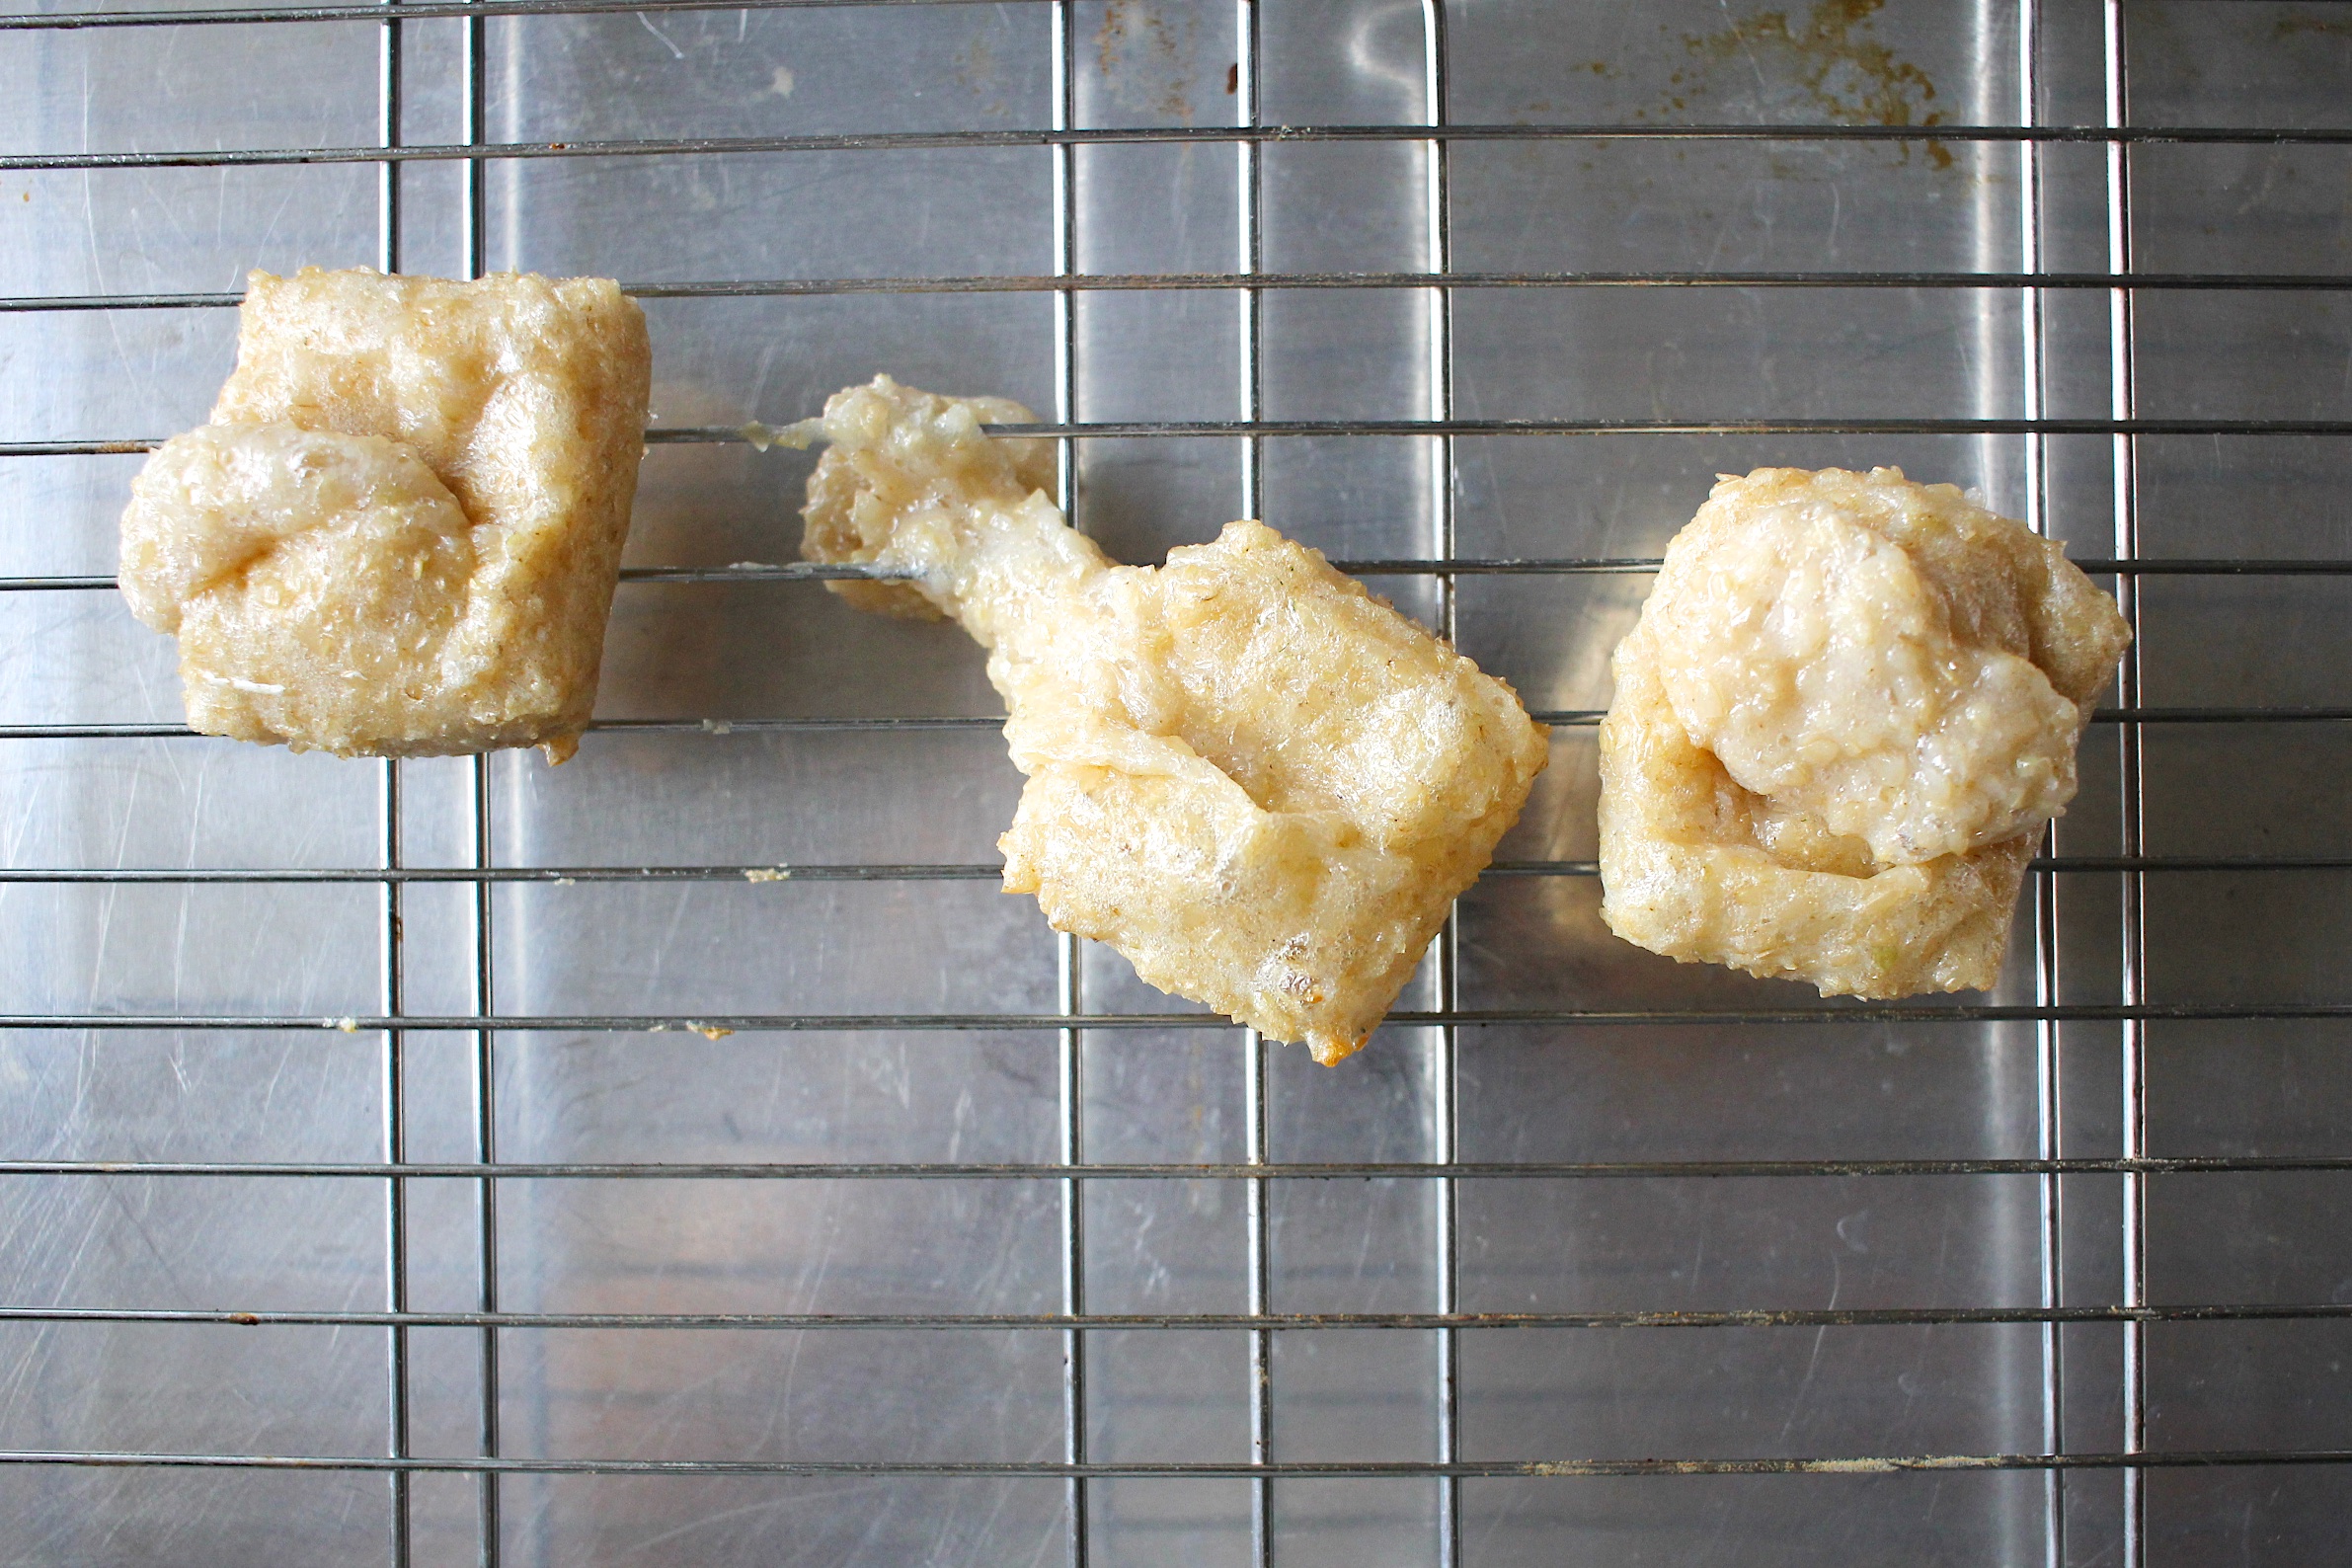
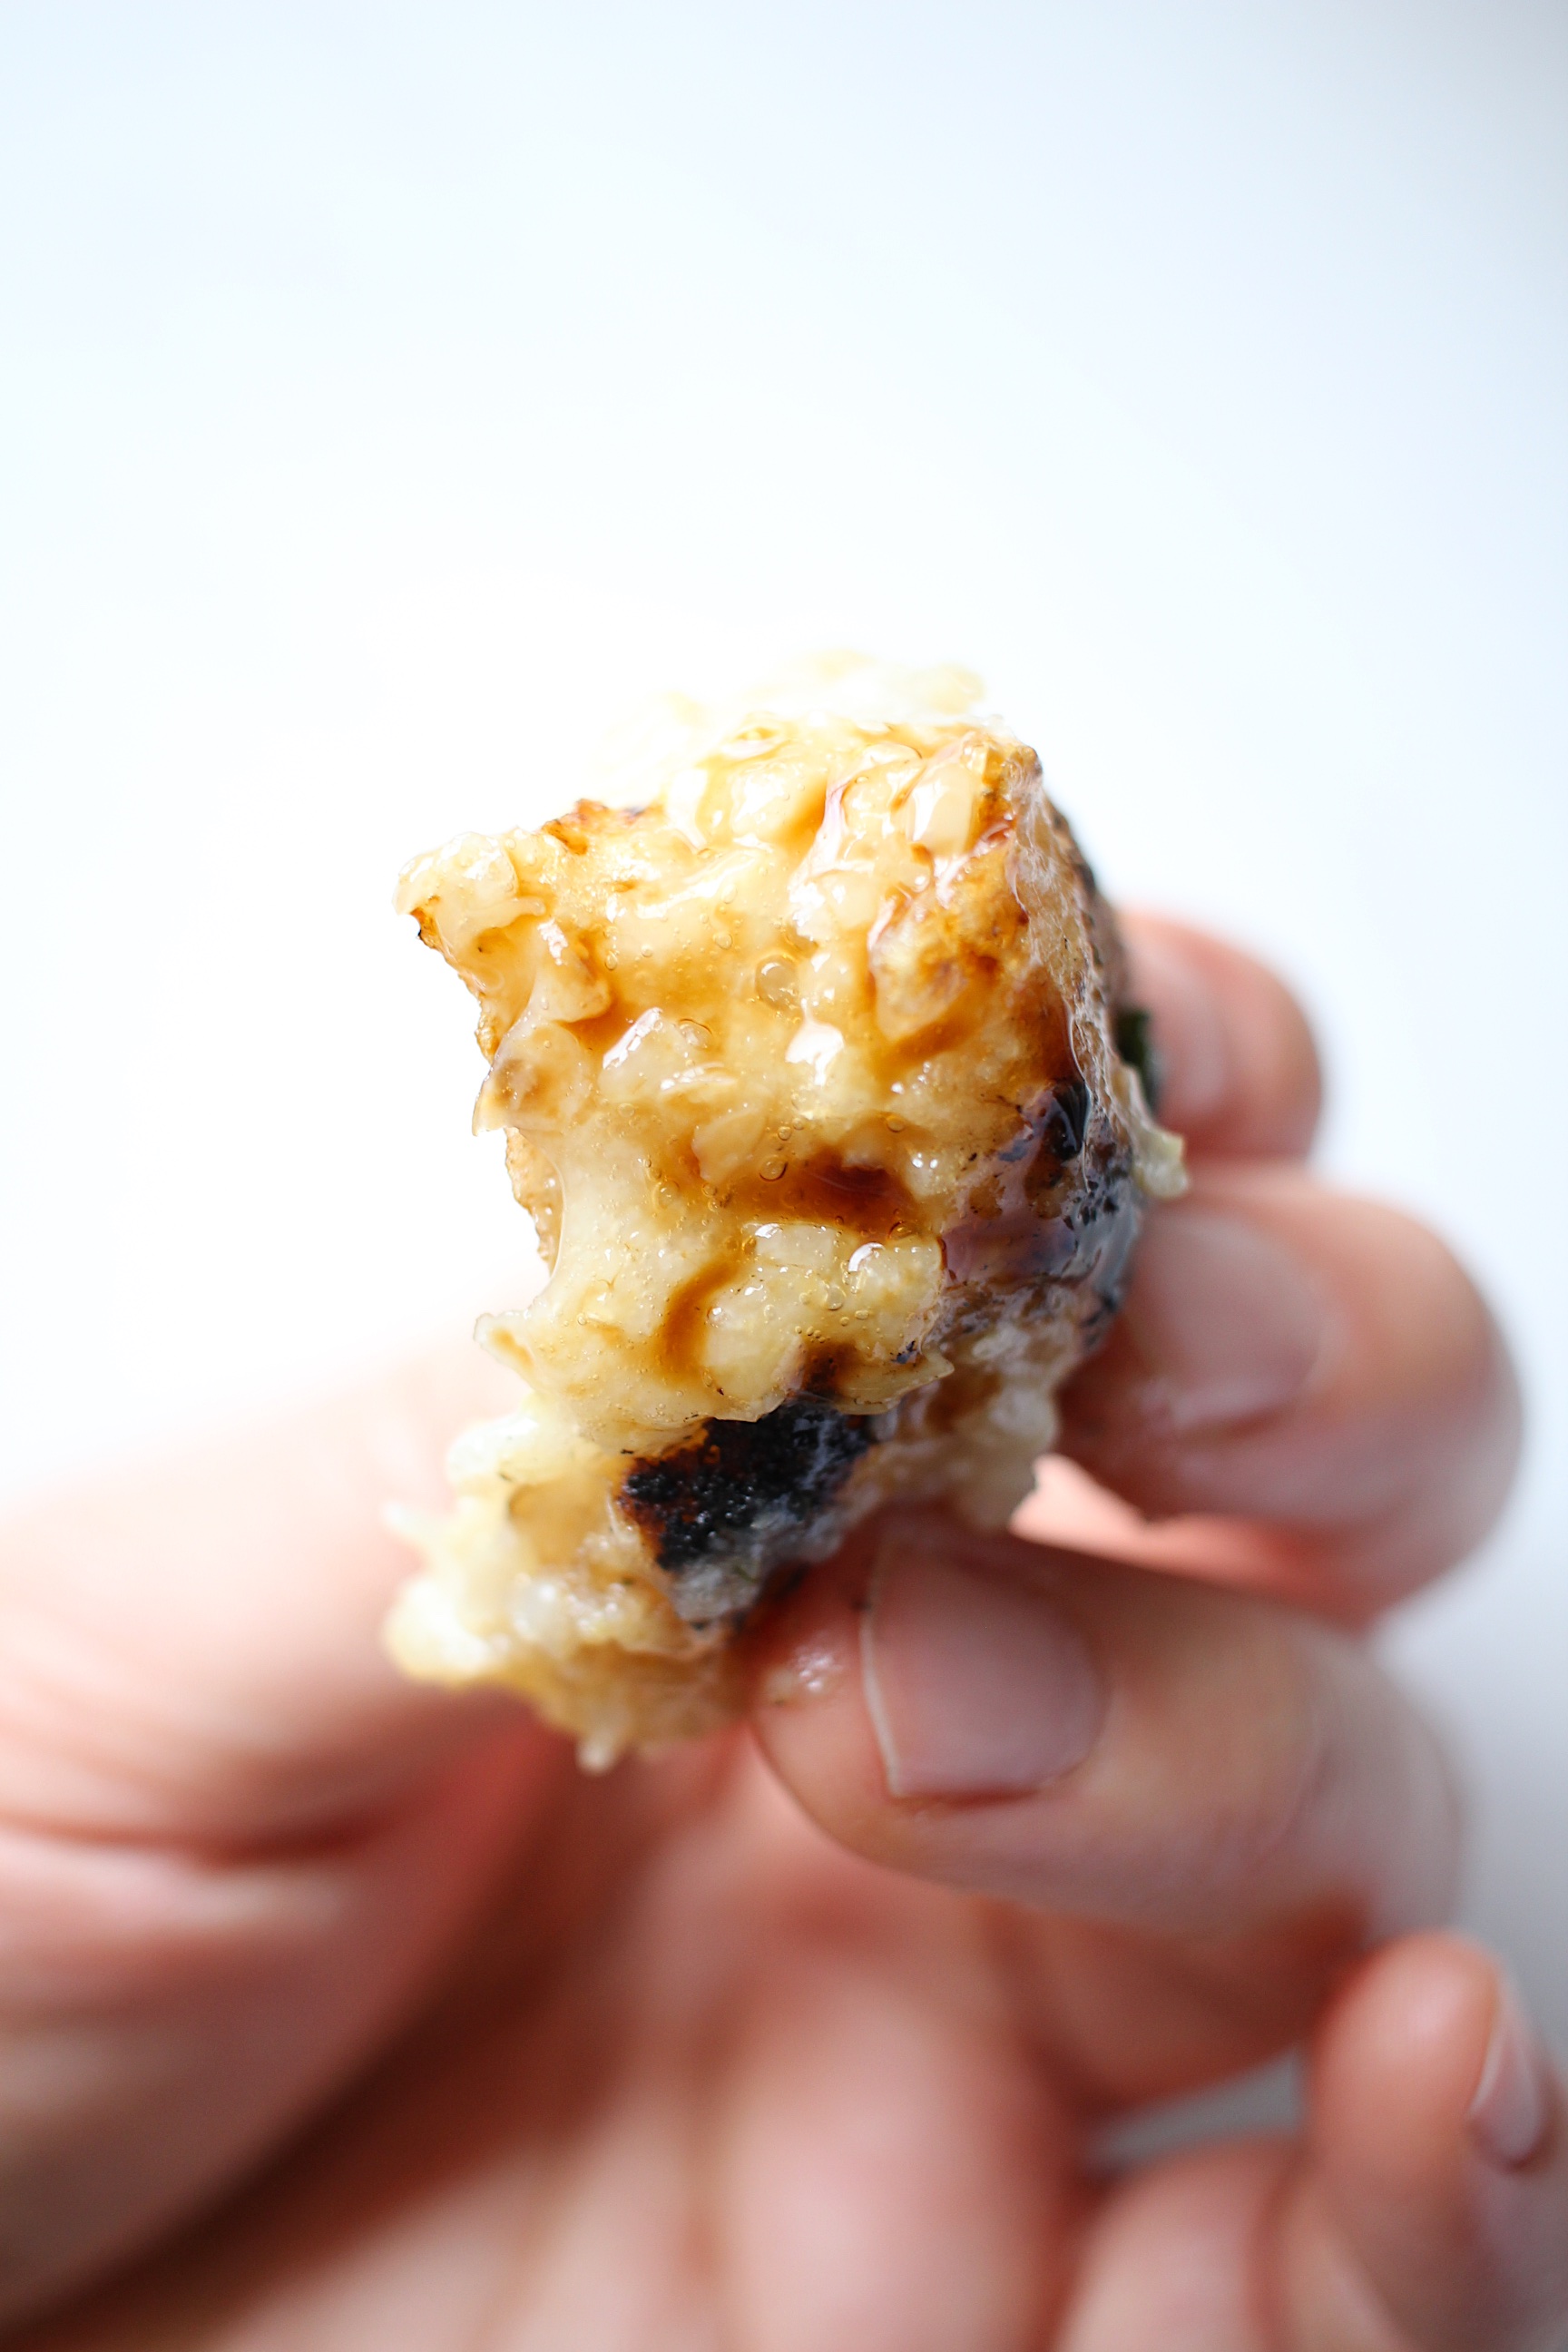
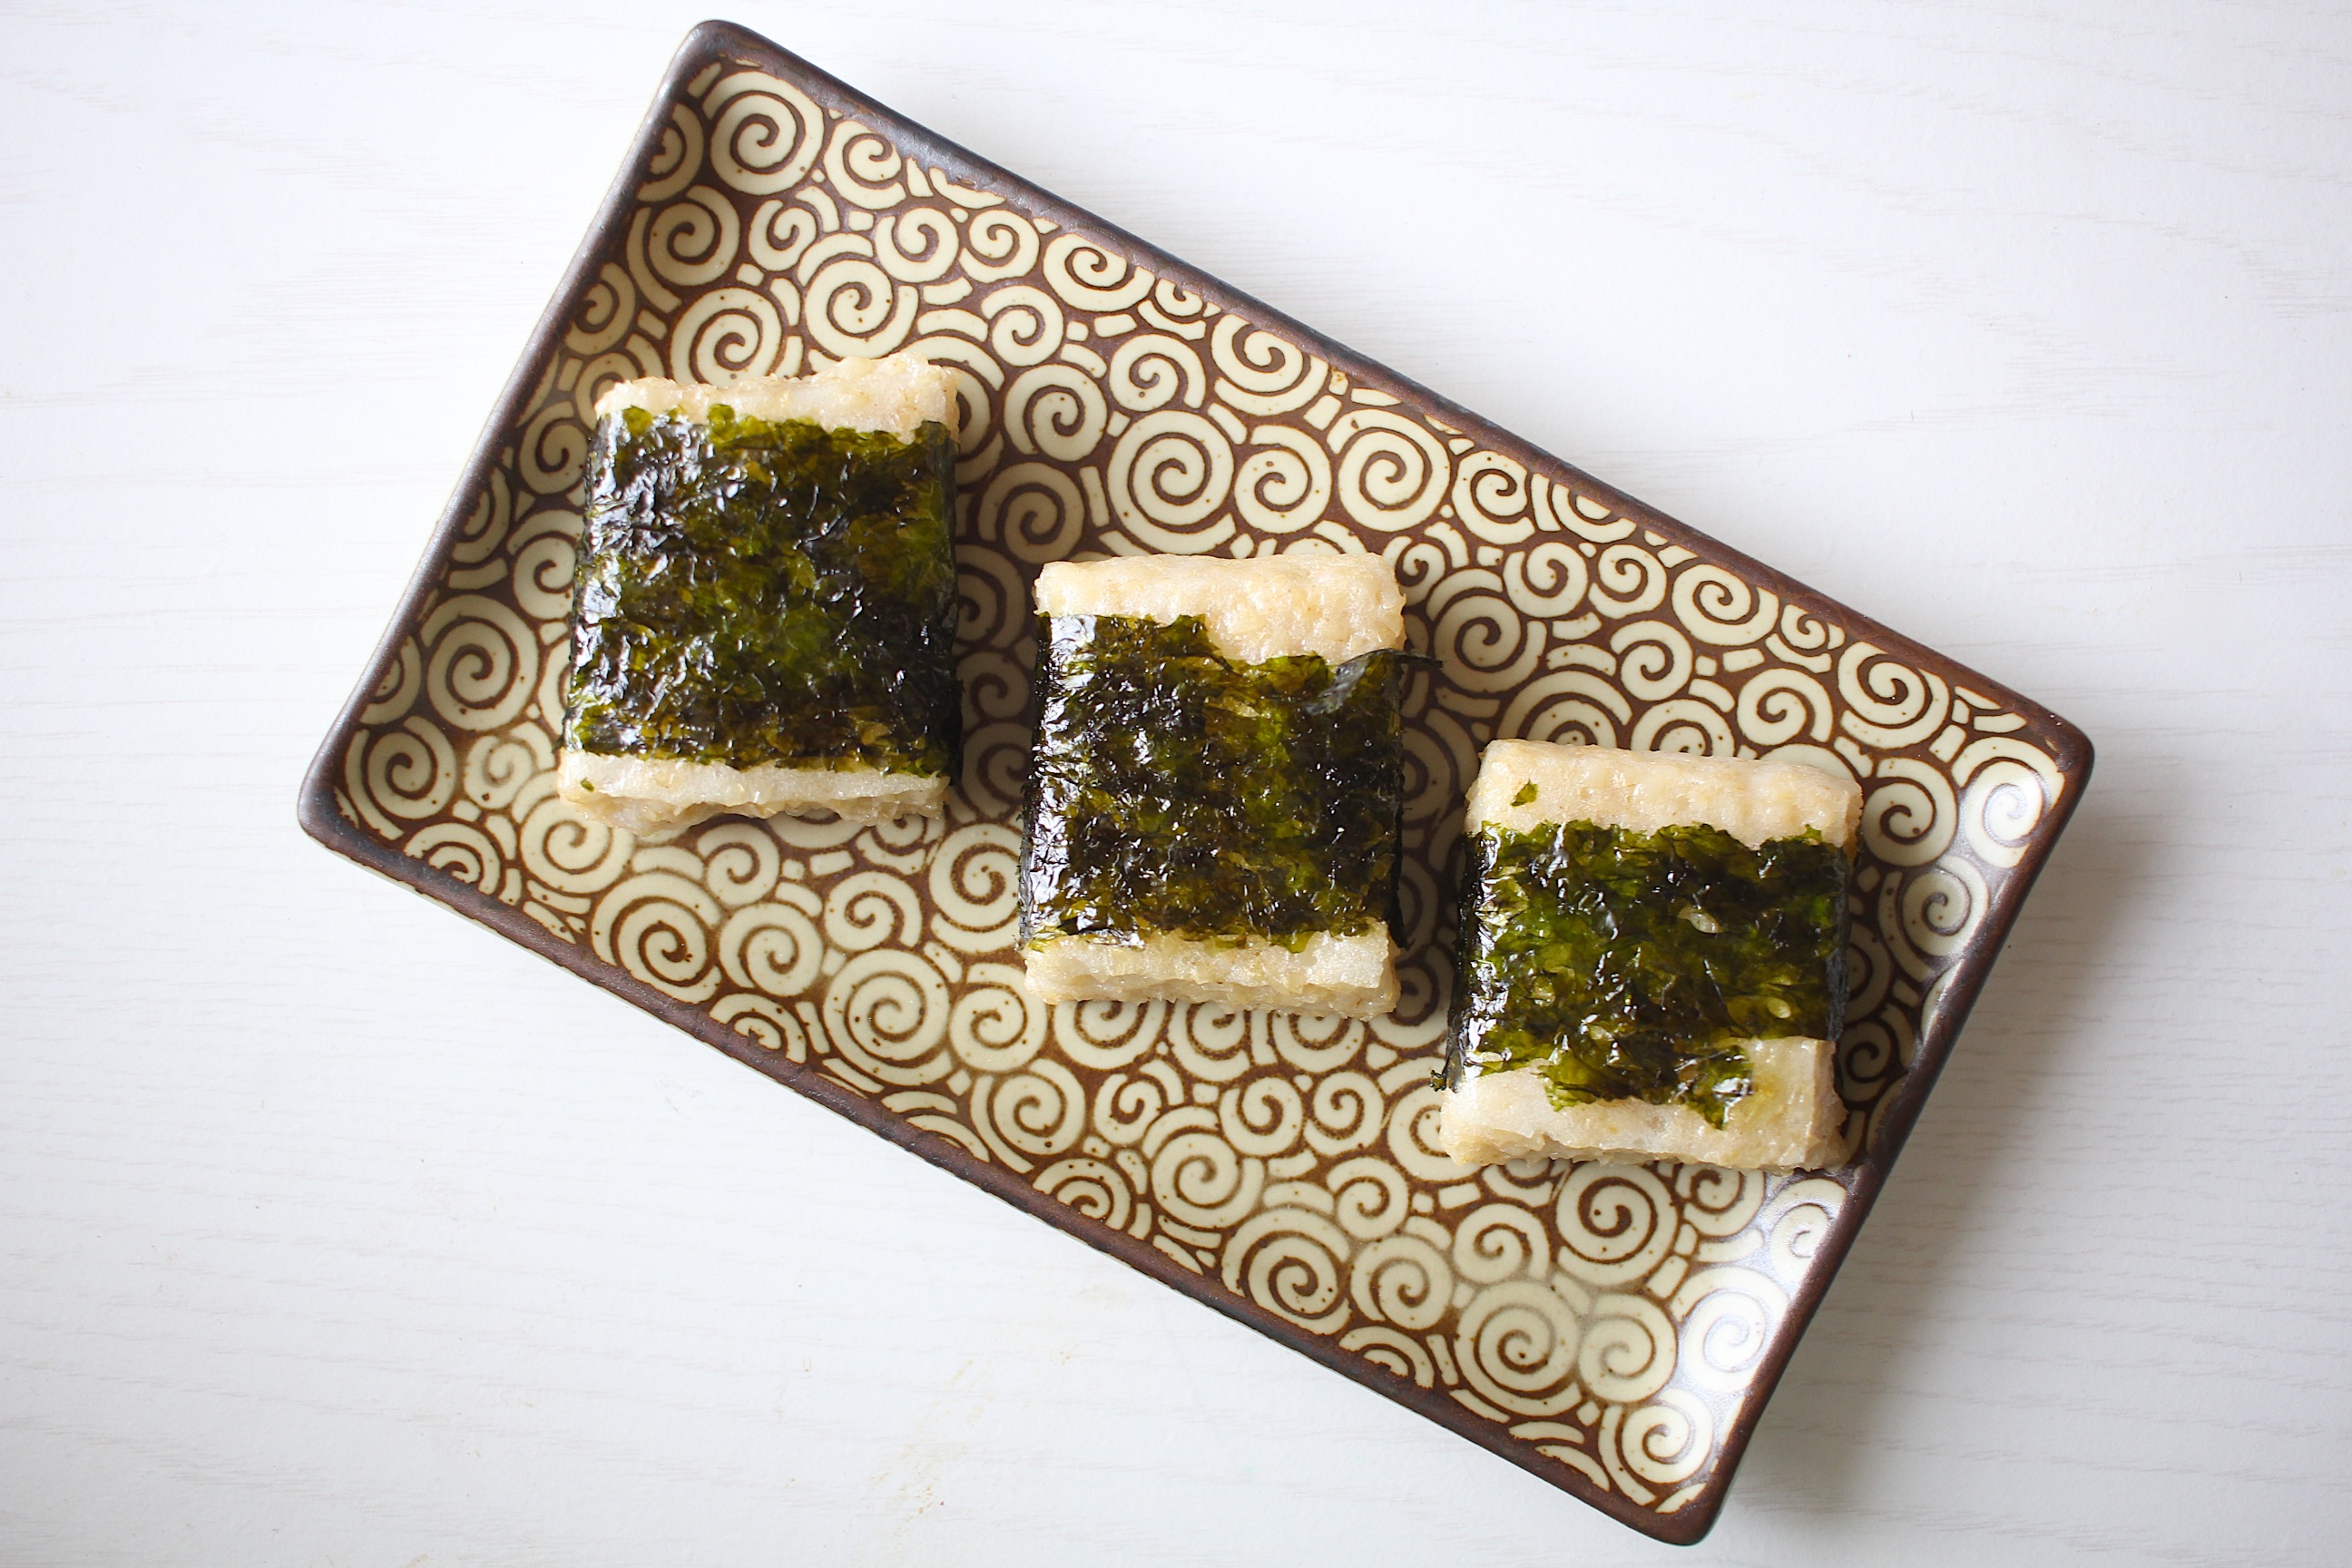
See, I didn’t even let those guys get much color at all, and the molten gooey burst! Gah! So good! These little guys are now ready to go into soup or get wrapped in a piece of nori (totally optional but awesome) and dipped in soy sauce. My favorite, actually, is freshly grated ginger in the soy sauce. Ohhhhhhh my, yes. Ok, so now go buy some sweet brown rice and let’s celebrate with mochi!
- 2-1/4 cups (or 3 rice cooker cups) sweet brown rice, preferably organic
- 3 cups very warm water, preferably purified and dechlorinated* (for soaking)
- 1/3 cup acidic medium such as raw apple cider vinegar or fresh lemon juice, or fermenting liquid
- 2-1/4 cup water, preferably purified and dechlorinated* (for cooking)
- 2 tablespoons soy sauce, preferably organic
- 1/8~1/4 teaspoons grated fresh ginger
- 1/4 teaspoon pure maple syrup
- 2 sheets of nori, cut into strips large enough to wrap around the finished squares of mochi
- Soaking
- In a clean large glass or ceramic bowl, combine the rice, 4 cups warm water, and acid or fermenting liquid. Cover, and let sit overnight or up to 24 hours.
- Once soaking is done, wash thoroughly to prepare for cooking.
- Cooking
- After rinsing the soaked rice thoroughly, shake excess water off and use one of the following methods, either with a rice cooker or on the stove top.
- Rice cooker method
- Add the rice to the bowl of the rice cooker and fill water to the 3 cup marking. It should amount to about 2-1/4 cups of water, which is significantly less than you would use to cook unsoaked grains due to the water absorbed during soaking. Turn on and cook according to regular brown rice setting on your rice cooker. (I've even used the regular white rice setting in my older model with no problems)
- Stovetop method
- In a large pot, combine soaked rice and water. Bring to a boil, then drop down to a simmer and cover with a tight fitting lid. Let cook with lid on until the water is absorbed and rice is fluffy, no longer opaque, and has a tender center, about 40 minutes.
- Making the mochi
- While the rice is still very hot, place all of the rice into the bowl of a stand mixer with the paddle attachment in place. Turn on the stand mixer to medium-low speed and let mix until the rice grains break down and get very sticky, with an almost gluey appearance, 8~12 minutes. Because you're using brown rice, it will never get perfectly smooth.
- Meanwhile, line an 8x8 square cake pan with parchment paper and spray lightly with cooking spray.
- Once the mochi is ready, scrape it out into the prepared cake pan, and using wet hands, spread it into an even layer. Let the top dry until no longer sticky and has formed a slight dry crust, then flip out onto a cooling rack and peel off the parchment to dry the other side. Once the whole block is dry but still springy to the touch, you can slice it into desired shapes with a sharp, wet knife, wiping the blade clean between cuts. (I always cut into 16 squares: 4 across, 4 down) Let dry until a crust has formed all the way around.
- You can use immediately or store in an airtight container for a few days.
- To serve, you can place under the broiler for about a minute or in a 550°F oven until the crust browns and the interior starts to ooze out. Mix together the soy sauce, ginger, and maple syrup in a small. Dip the roasted pieces of mochi in the sauce, wrap in a sheet of nori, and eat immediately.
- If using the stovetop method, it's a good idea to use a pot with a glass lid if you have one. Doneness is more about appearance than time, so it's nice to be able to keep an eye on it without letting the steam escape.
- *to dechlorinate and purify water, simply boil for 20 minutes and let cool to room temperature.
Comments
- Brown Rice Moffles (Mochi Waffles) 玄米モッフル - Scratch Eats - […] me tell you a little story. In Japan, mochi is often roasted over hot coals to get that amazing…


Jillian
August 21, 2017
Hi I can’t wait to try this, quick question would this work with a food processor?
Thank you
Lillian
August 21, 2017
Hi Jillian! Thanks for stopping by! I’ve never done it in a food processor, but I have a feeling it wouldn’t work too well. The type of rice you use for mochi is so extra sticky that I’d be worried it’d get stuck on the blades and burn out the motor. Mochi is traditionally made with with a pounding/beating motion, so I think the stand mixer mimics that better. Let me know how it works for you!
Lauren
March 20, 2018
Hi Jillian, I actually made this in my food processor and while it did make delicious mochi, it also made a mess: lots of the gooey liquid went through the middle hole and went everywhere (big, sad waste) and I nearly broke my food processor while mixing the rice.
Charm
November 26, 2018
Hi Lillian, thanks for posting this recipe, looking to try it with black glutinous rice that’s more common here in Southeast asia 🙂 may I know what’s the purpose of adding the fermenting liquid? If left out will it affect the final product? Thank you!
ak adair
December 29, 2019
Hi I just saw this while looking for different ways to eat my Mochi, just wanted to let you know an air fryer works great for getting the Mochi nice and crispy on the outside and chewy in the center 🙂
Rachel
February 17, 2020
Hi: I’m about to soak my rice but I don’t understand the difference between regular cups and “rice cooker” cups. I’m going to use an Instant Pot to cook the rice. Can you please clarify? Thank you!
milt
February 19, 2020
i have a nutri bullet that can turn rice into rice powder,,,i think maybe like mochiko. have not tried it yet. but if i can, how would i go about making the mochi that way? thx