Homemade Gyoza
These dumplings are packed with flavor with a tender and chewy top and crispy bottom, just the way gyoza should be. I’m going to show you a few tricks I’ve learned to make them perfect every time.
When I was a kid, gyoza was always one of my favorite dinners. My mom didn’t make them super often, but when she did, it was a race to beat my teenage bottomless-pit of a brother so I could get my hefty share of the deliciousness. Gyoza is one of those awesome Japanese comfort foods that has been adapted from Chinese cuisine. From what I understand, they’re very similar to their Chinese counterpart, but the Japanese dumplings tend to have thinner skins and more vegetables in the filling. The extra vegetables lend to a more tender filling, which I prefer. There are so many variations and so many “secret ingredients”, every family has their way of doing it. And honestly, I bet my mom even makes it differently than I do. But no matter who makes it, the ingredient list tends to be pretty simple.
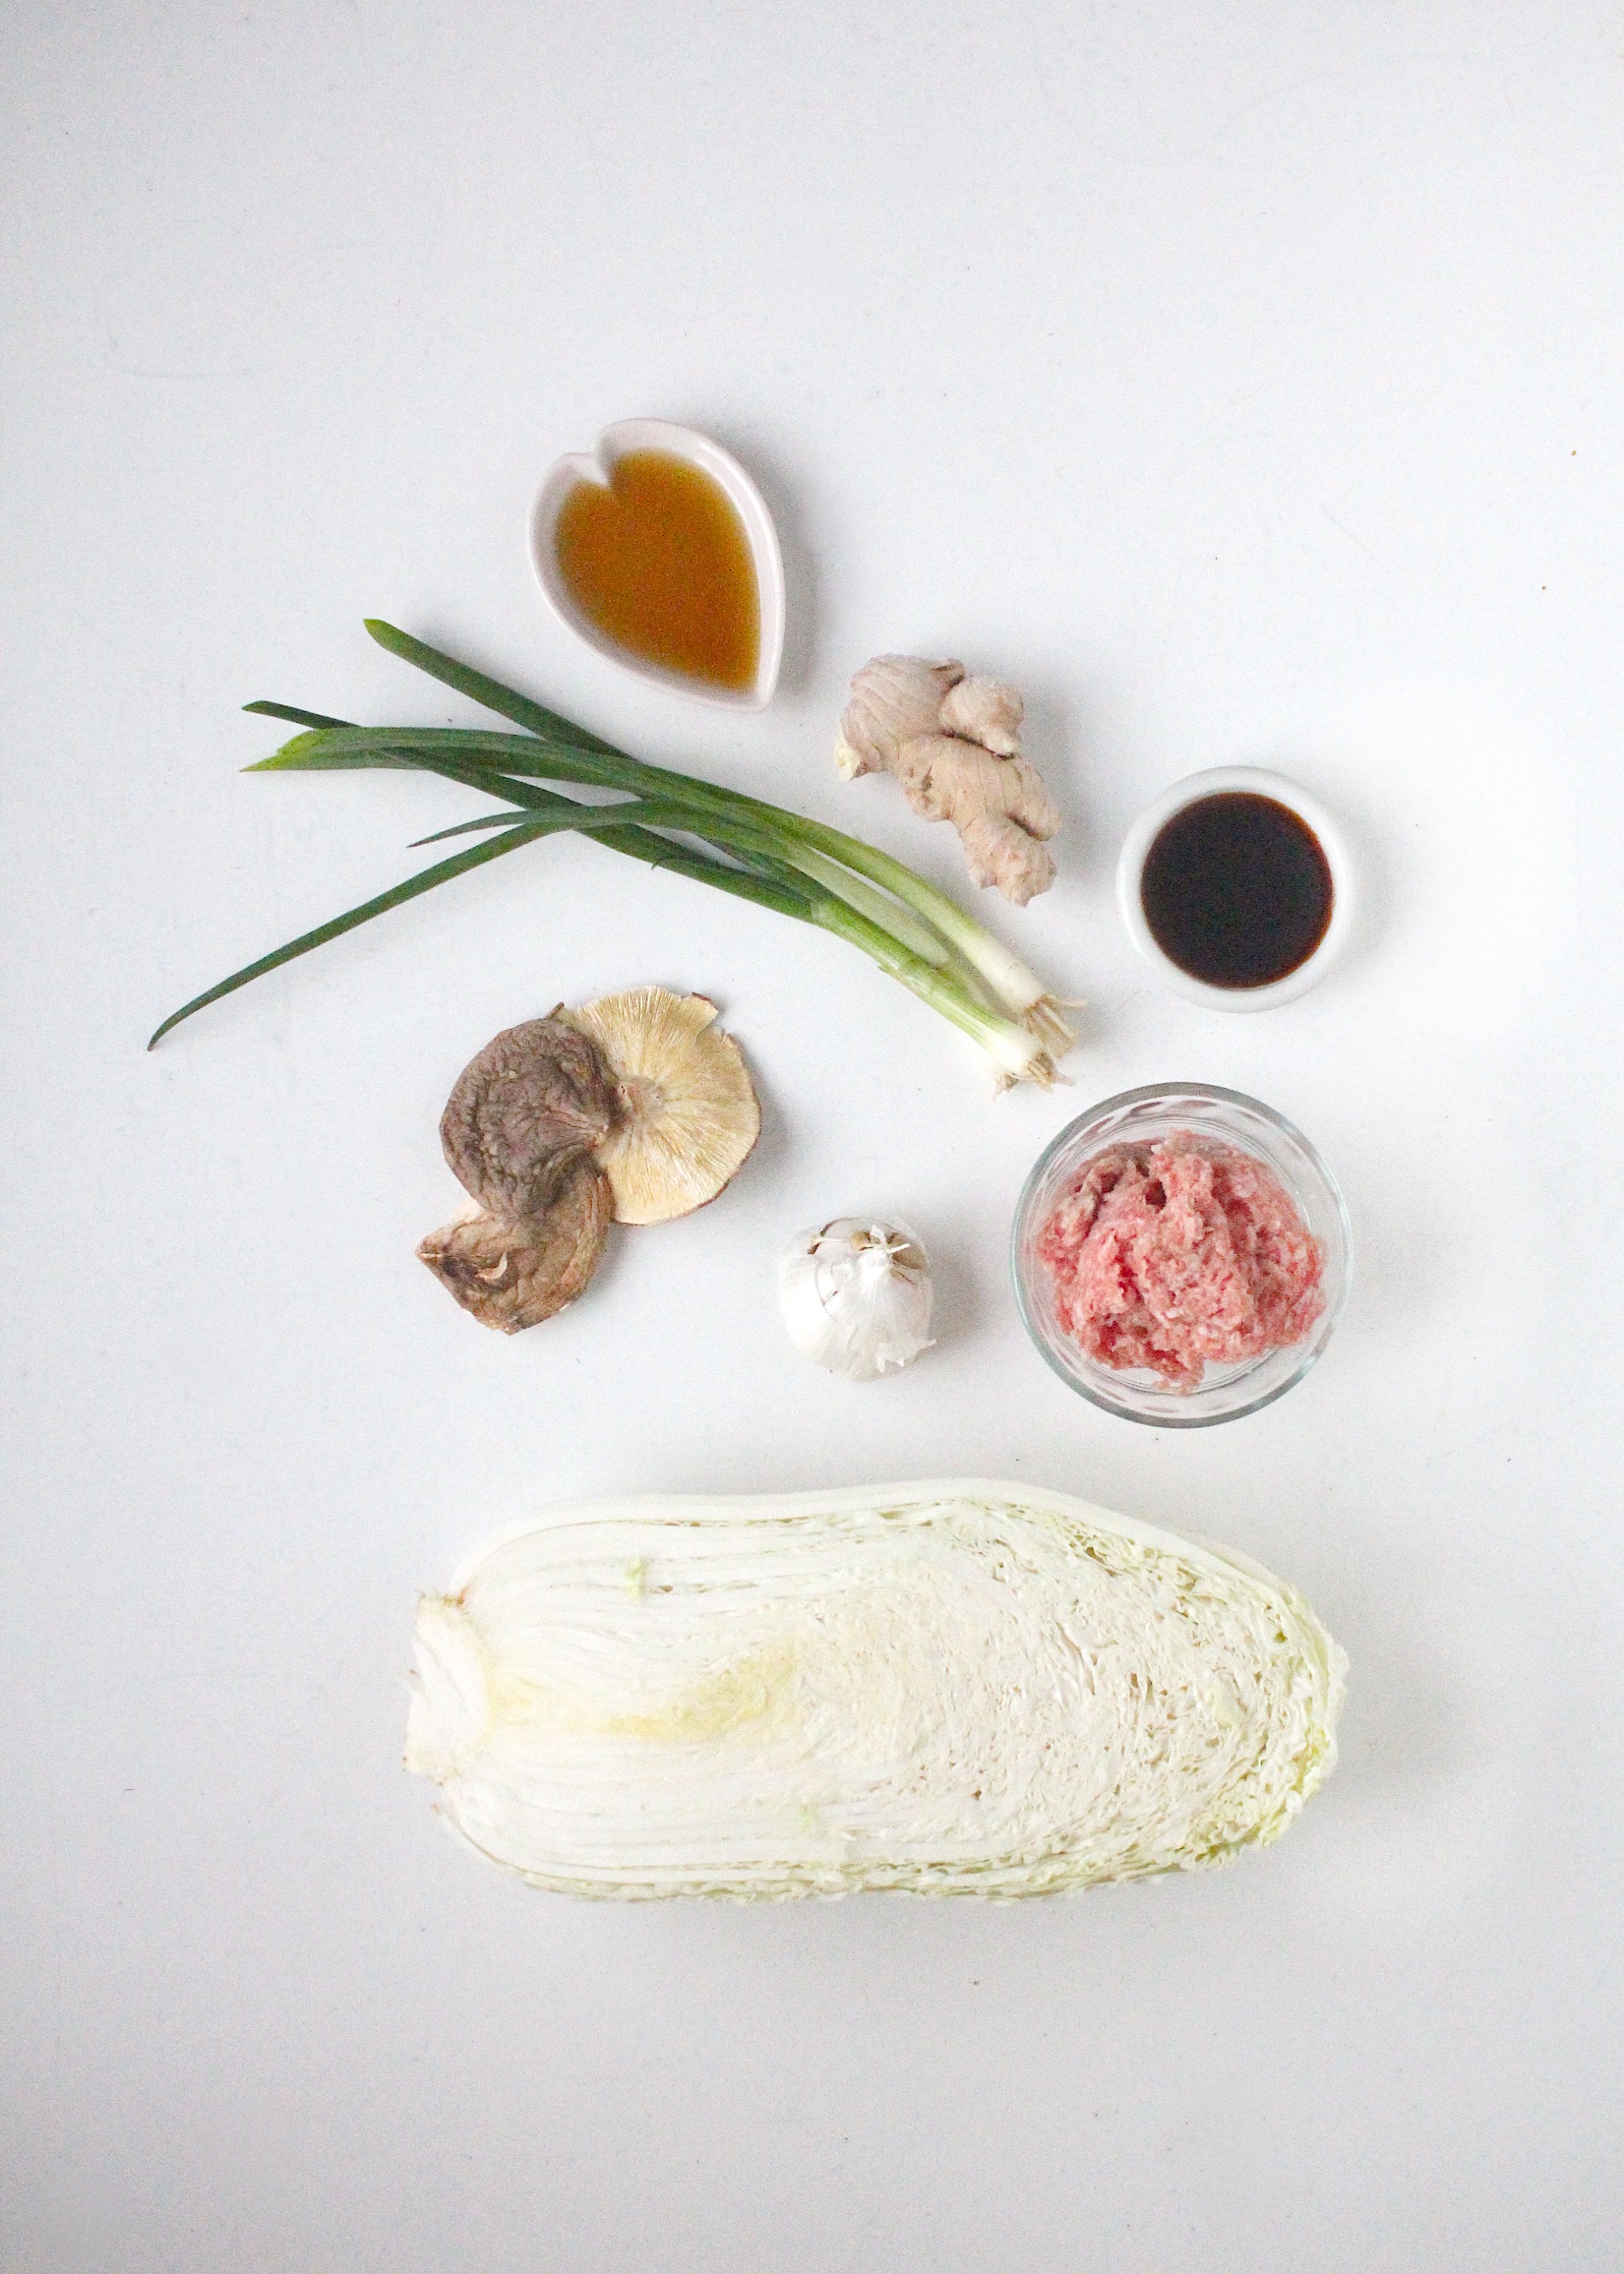
The main ingredients are pork and nappa cabbage (though savoy and plain ol’ green cabbage work really well as a substitute). Then you add your aromatics: garlic, green onions, and ginger. And last but definitely not least, your flavor boosters: soy sauce, toasted sesame oil, and shiitake mushrooms. And as I always recommend, when using soy products, stick with non-GMO and organic. My favorite is the Japanese imported Kikkoman organic soy sauce, which I highly recommend. I often buy it at my local Asian market, but you can find it online as well. You want everything chopped really fine and then you use your hands and knead/squish/mix it all together until it’s evenly mixed. There’s your filling. Now we get to the step that requires a little practice.
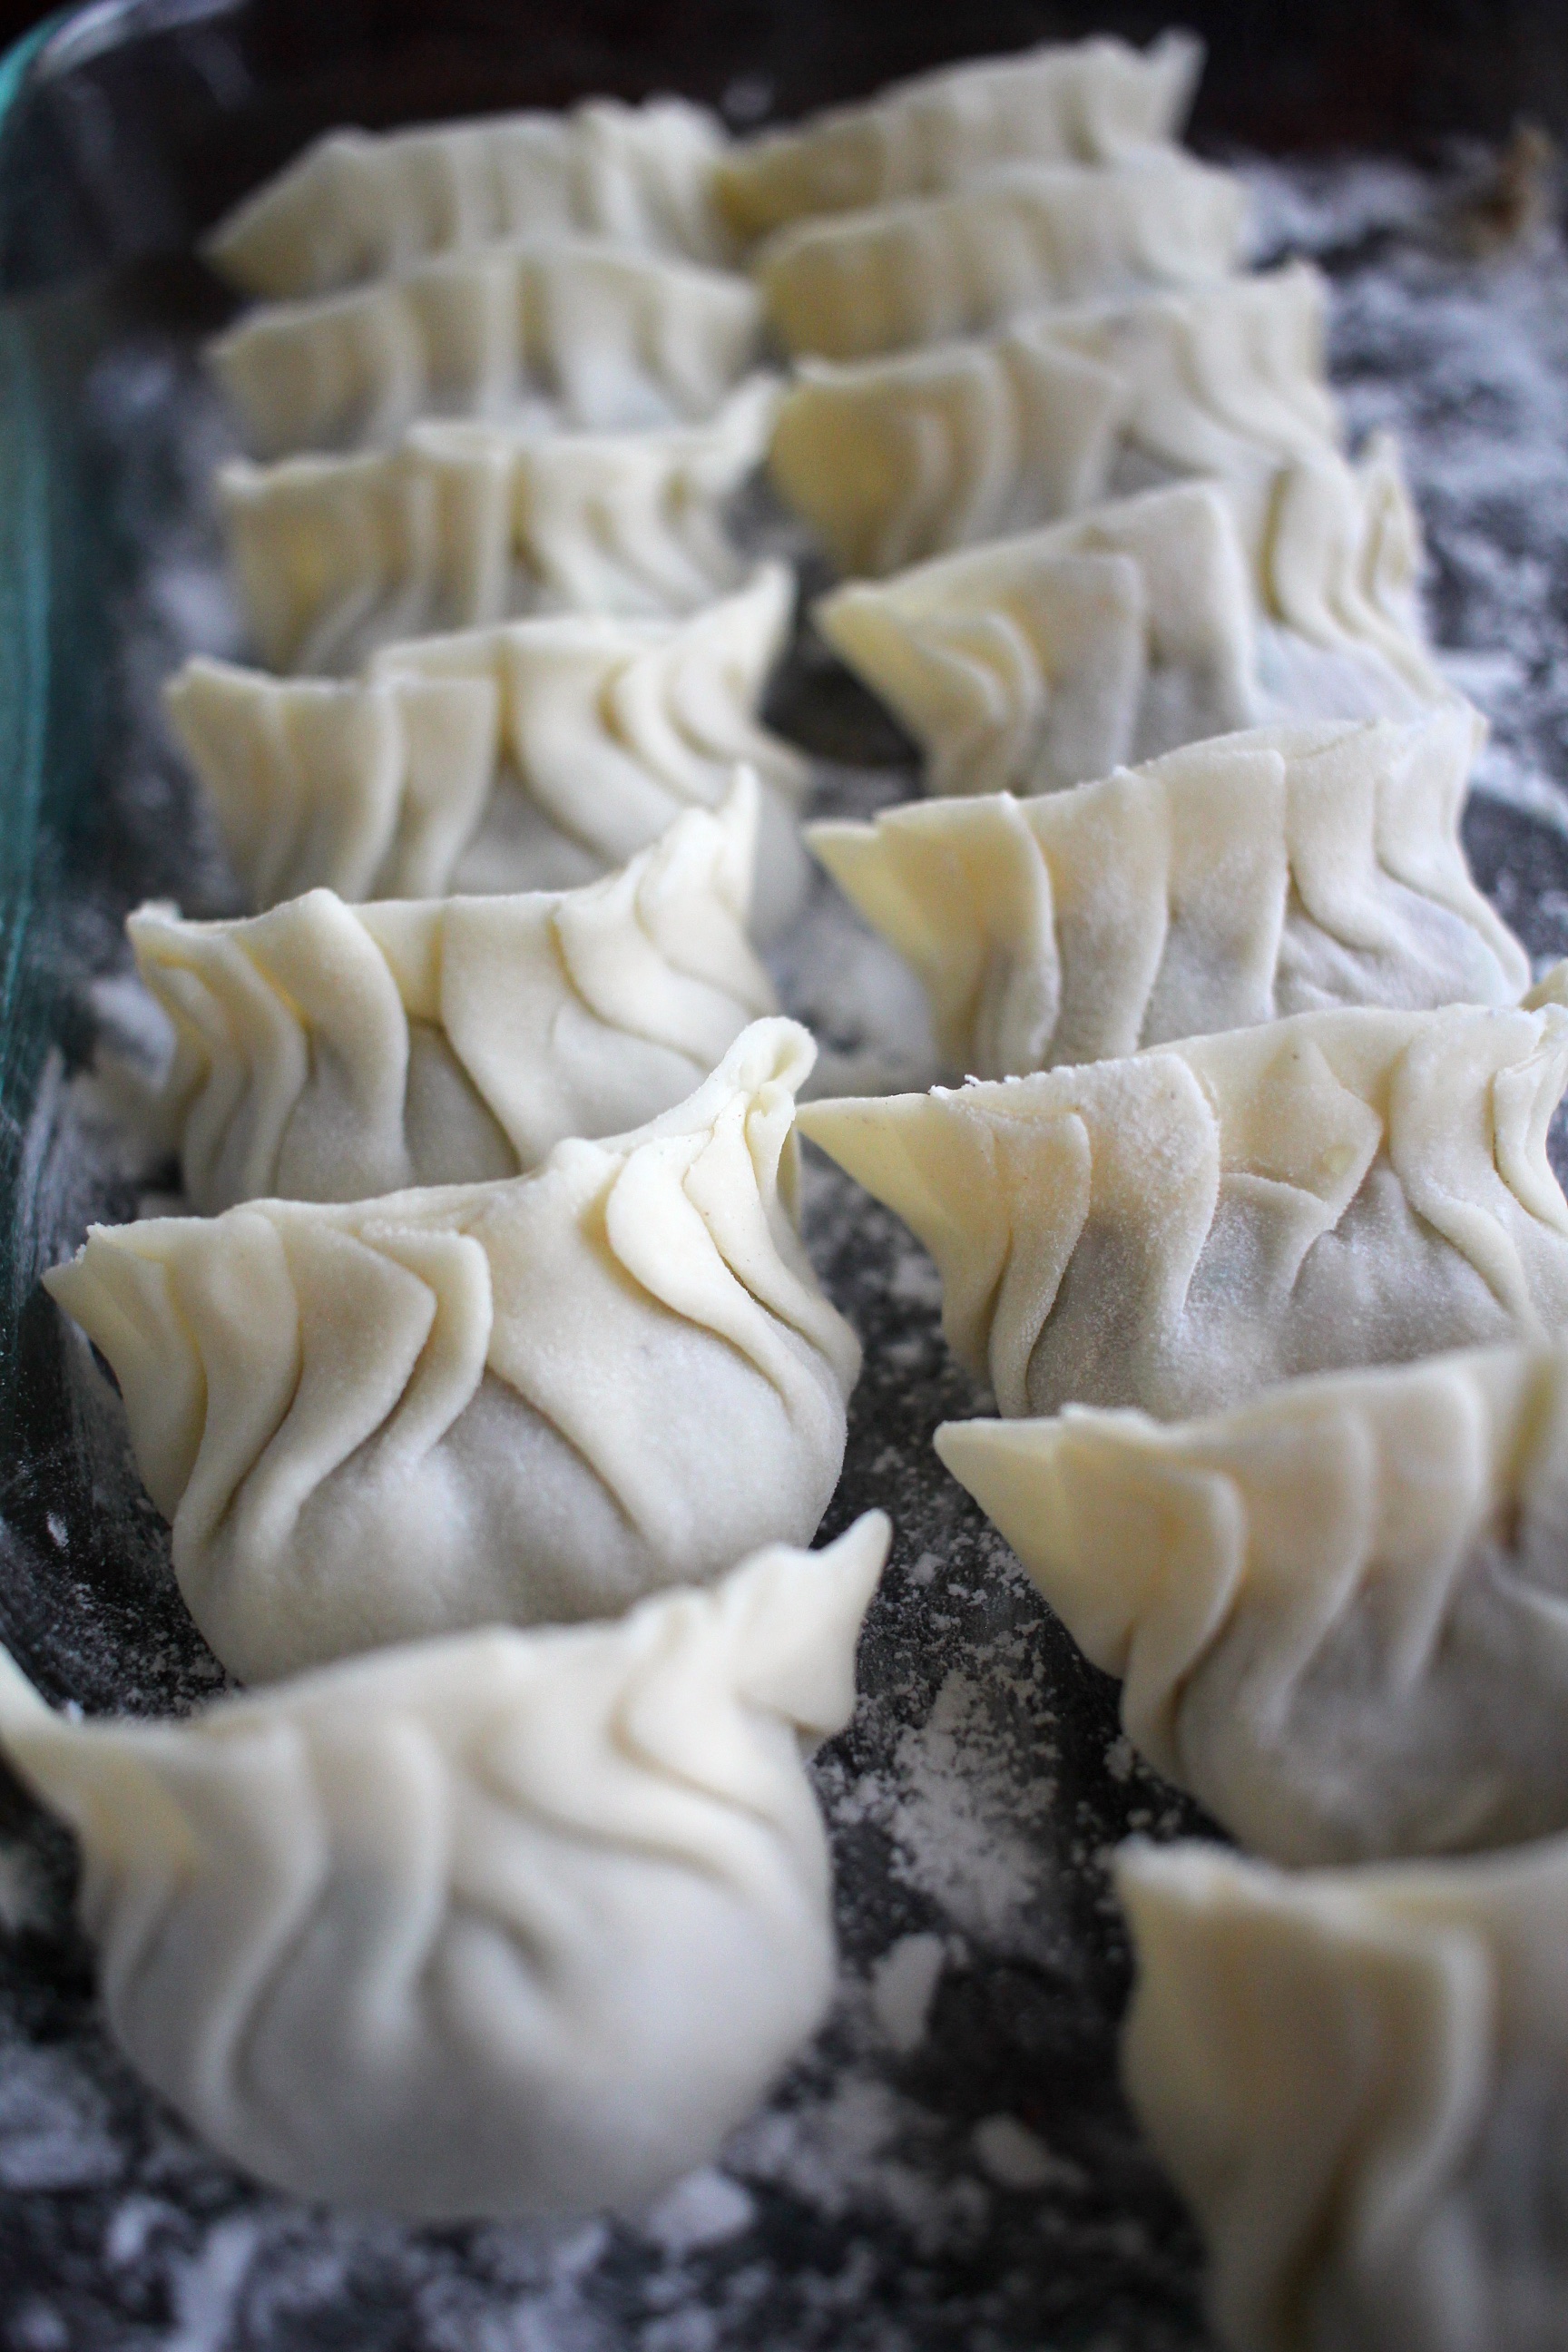
Ok, but before you start, don’t get discouraged. You first few (or first few hundred) will possibly be really ugly. And that’s ok! Mine were always way misshapen and irregular until my sister-in-law taught me the method that I use now. And they’re consistent and uniform, if I do say so myself. My mom, and I think most people, like to pleat from one side and go all the way across. When I did that I never seemed to be able to gauge how much skin I had left and I could never get that pretty crescent shape that’s so important to the final result of the dish. So now I start in the middle and pleat in one direction, then pleat the other half. But even this has taken me years of practice, so be patient with yourself. For now, as long as they’re sealed shut, they’re usable. But aim for the pleats with the crescent shape.
And there you have lined up, prettily pleated gyoza. Pat yourself on the back. And while you’re at it, get a back rub because you might be a bit achy. Filling it by far the most time consuming and tedious part of the process. I always make these on a day when I have the time to make a ton so I can freeze them and eat them whenever I want. They really freeze beautifully. All you have to do is line them up on a heavily cornstarch lined plate or pan, and make sure they’re not touching each other. Place in the freezer for a couple of hours until the outer layer is completely frozen, and pop them in a freezer zip-top bag or other container. When you’re ready to cook them, just follow my instructions below and add a minute or two to the steaming time, just to make sure the pork gets completely cooked through.
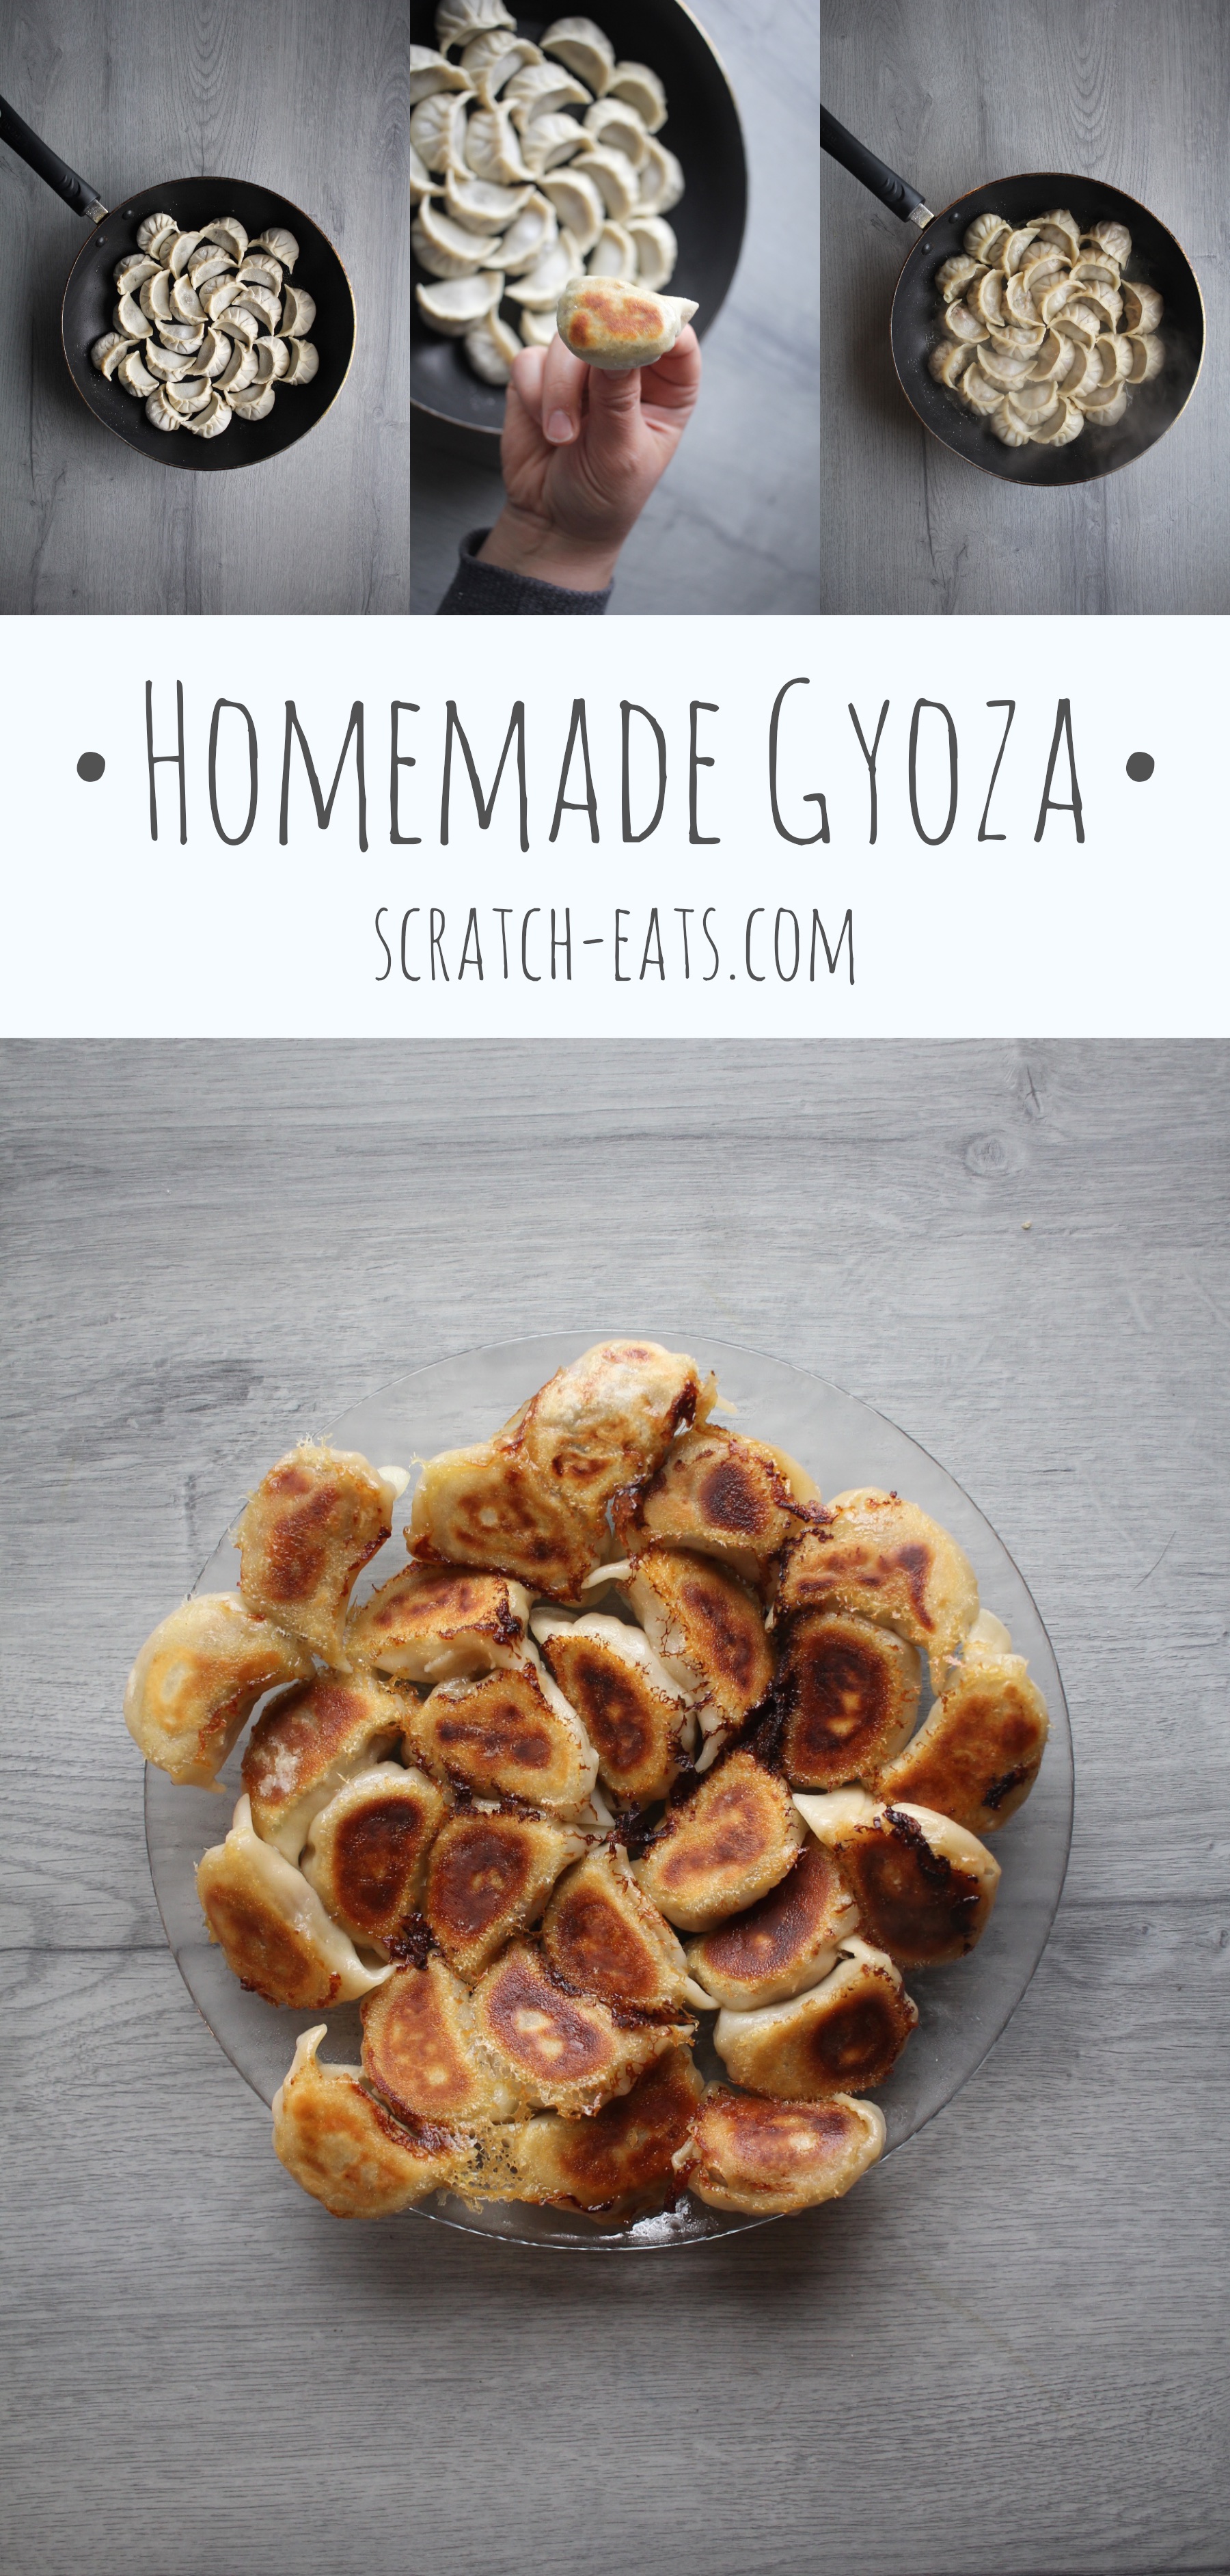
Now, let’s talk about cooking them. Pick up one gyoza and flip it over. See that pretty crescent shape I was talking about earlier? That’s your surface that gets crispy. Everything else steams. So please please please please PLEASE don’t be tempted to flip over and try to brown all 3 sides. This is not a fully crispy dumpling. You are welcome to deep fry them if you want, but they won’t be gyoza anymore. They’ll be deep fried dumplings. And … YUM.
But you have to try the proper pan fried & steamed combo because, well, they’re amazing. Plus I’ve worked so hard to show you! So stick with me here!
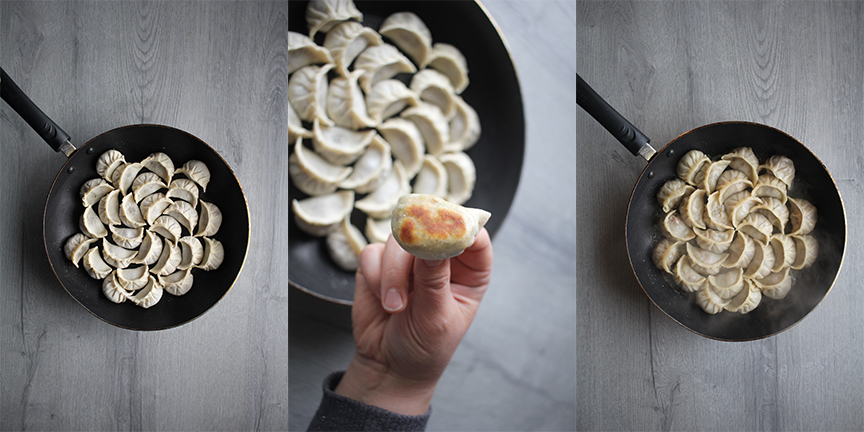
First rule: don’t be a hero, use a nonstick skillet. And one with a lid. If you have issues with teflon, there are so many other awesome options out there, just make sure you use something nonstick. there’s nothing worse than beautiful food that won’t come out of the pan. And unless you’re super ripped, cast iron (even a really well-seasoned one) isn’t recommended because you’ll be picking it up and flipping it over in the end.
Start with a little bit of oil, medium high heat, lay the gyoza down in whatever pattern you like. I like the concentric cirle/flower shape, but lining them up is lovely as well. You just want even heat distribution. Make sure there’s a sizzle as they touch the pan. Cook, uncovered for 3-5 minutes until the bottoms have a lovely light golden brown crust, then (and here’s my secret) you pour some water mixed with cornstarch (non-GMO and/or organic, please!) and put the lid on right away. Let that steam for 3 minutes, take the lid off, and let it keep cooking until the starchy water evaporates and leaves a nice, light crispy web on the bottom. Place a plate on the top, flip it over, and …
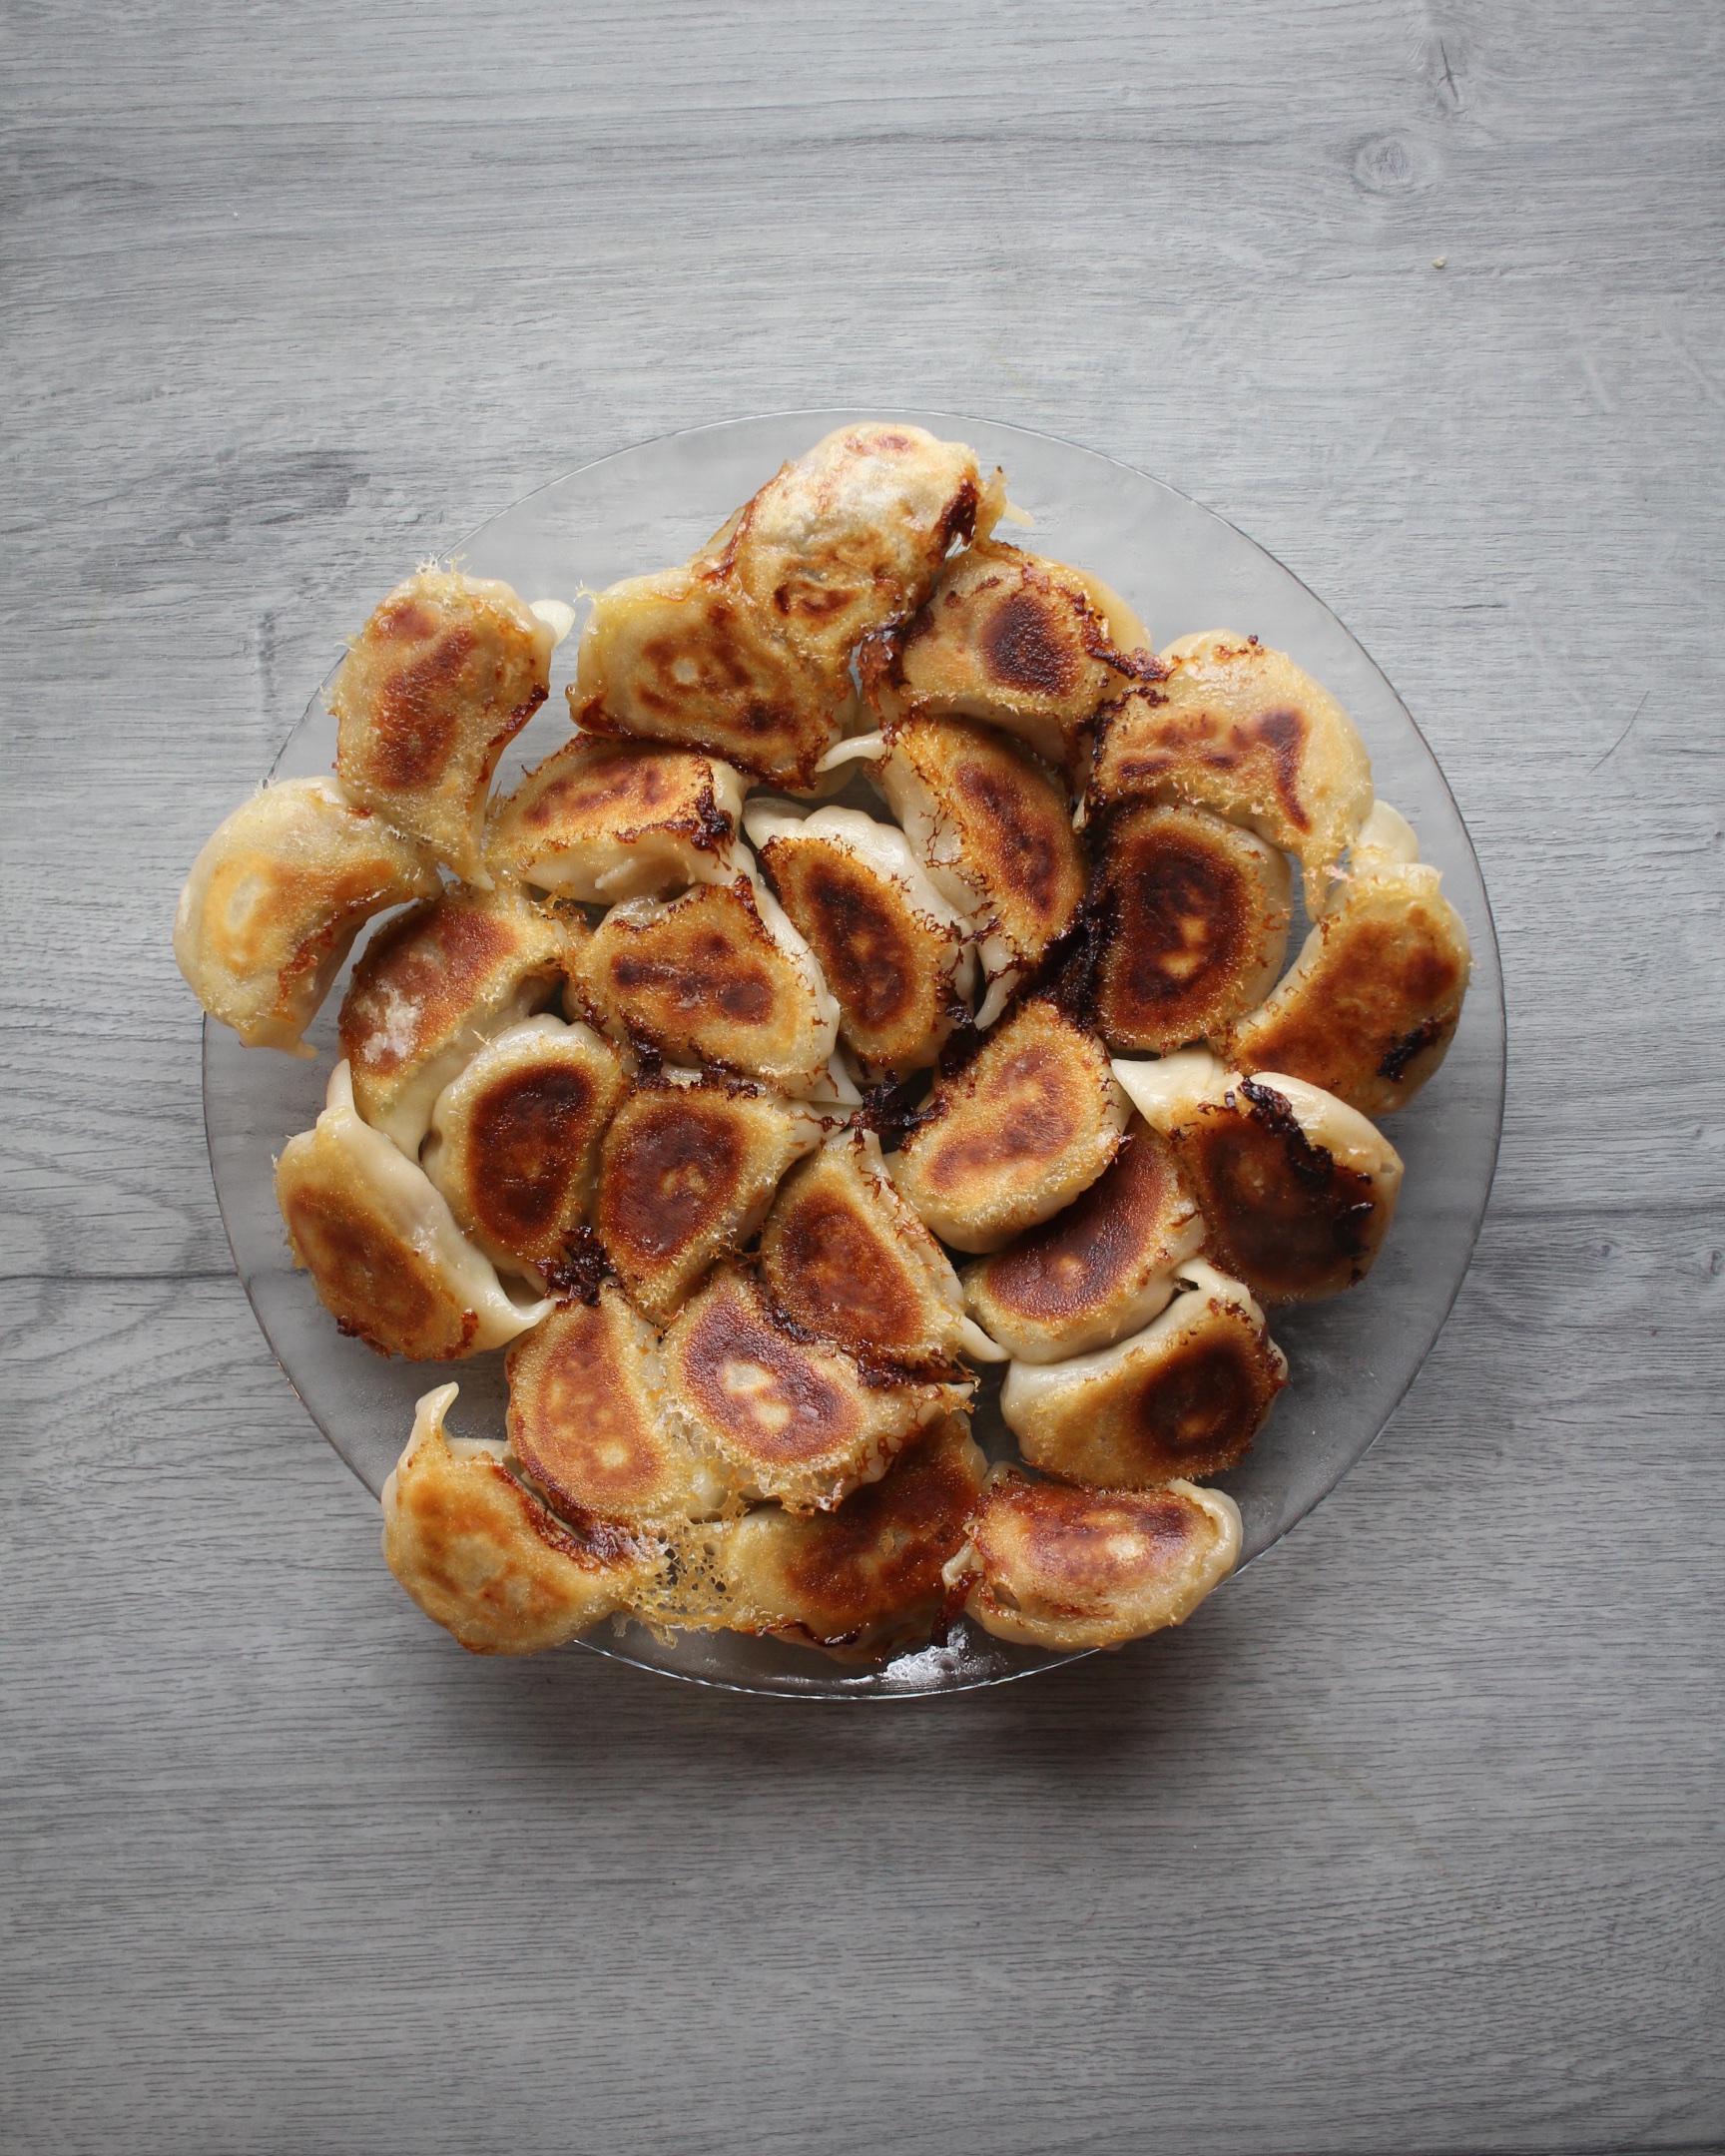
SO HAPPY!!!! I want to eat that whole plate right now, and I’m so full from leftover frozen gyoza. Resist the urge to flip them over to show off your hard work pleating them. Trust me, preserving that crisp crust is more important.
In Japan, we like to a very clean-tasting dipping sauce: soy sauce, rice vinegar, and optional white pepper and chili oil (la-yu). Eveybody likes different ratios, so experiment until you find your right balance. I like mine super vinegary, my husband doesn’t like any vinegar (which is totally not ok, IMO;)). Served alongside some soaked brown rice, you’ve got yourself the best dinner ever.
- 1 lb ground pork
- 1/2 large or 1 full small head of nappa cabbage*
- fine sea salt
- 3~4 dried shiitake caps, soaked in warm water for at least 1 hour, and minced
- 3 medium cloves of garlic, grated finely
- 1 tablespoon and 1 teaspoon ginger, grated finely
- 3~4 green onions, minced
- 3 tablespoons soy sauce
- 3 tablespoons toasted sesame oil
- cornstarch, preferably non-GMO and/or organic
- neutral tasting oil, such as avocado oil, for cooking
- 50~70 gyoza skins, store bought or homemade
- soy sauce
- rice vinegar
- white pepper, optional
- chili oil (la-yu), optional
- Chop the cabbage roughly and add to the bowl of a food processor and pulse until finely minced. Line a colander with a non-terry clean kitchen towel, and place the minced cabbage in it. Sprinkle liberally with salt and mix with your hands to combine. Let it sit at room temperature for 15 minutes. Gather the ends of the kitchen towel and twist it around the cabbage. Squeeze as much as you can until all of the excess water is removed. Place the cabbage in a large bowl and add the pork, shiitake, garlic, ginger, green onions, soy sauce, and sesame oil. Using your hands, mix thoroughly. You'll want to mash the mixture together between your fingers until you have a cohesive, sticky filling that will hold together.
- To prepare the gyoza, dust a large tray liberally with cornstarch. Place a skin the palm of your hand and place a small amount of the filling into the center.** If you're using storebought skins, you'll need to wet the tip of your finger with water and run it along the border of the top side of the skin. If using fresh, homemade skins, this step is unnecessary, as they with stick together and seal without the extra water. Fold the skin over and pinch the center where the edges meet together. Starting with the right side, pleat down the side of the skin facing you, curving backwards a little bit as you go. Try to fit in 3~5 pleats. Once the right side is done, repeat with the left. Repeat with remaining filling and skins.
- To cook the gyoza, heat a large (12 inch) skillet over medium-high heat. Pour about 1 tablespoon of neutral tasting oil in the pan and swirl to coat. Once the oil is shimmering, add the gyoza in the pan starting in the center and working out in a circle, fitting as many as you can in the skillet. Let them cook for about 3~5 minutes, until the bottoms are golden brown. Meanwhile, mix together 1/4 cup water and 2 teaspoons cornstarch. Once the bottoms are browned, pour over the cornstarch and water mixture and cover with a lid. Let cook for 4 minutes (5 if using frozen gyoza). Remove the lid and continue to cook until the water has evaporated and the crisp crust forms, about another 2~3 minutes. Place a plate upside down on top of the gyoza and flip them over so that the crust is displayed. Repeat with remaining gyoza. Serve hot with dipping sauce.
- *savoy cabbage and regular green cabbage are appropriate substitutes
- **start small, about 1~2 teaspoons and as you get comfortable, work up to 1 tablespoon
Comments
- Homemade Gyoza Skins - Scratch Eats - […] that you know how to make your own gyoza, let’s talk about the skins. If you’ve been buying the…