Sourdough Starter from Scratch
Here it is. I’m going to talk about my relatively new obsession of baking bread with a sourdough starter. I’m still kind of a newbie at this, but I don’t buy bread from the store, bake my own loaves a few times a week, and have had several successes. And now that I’m getting the barely-gripping-with-my-baby-sized-fingertips hang of this, and don’t use commercial yeast anymore, I think it’s time I share my sourdough story.
Ok, so maybe I’m a little bit behind, but I had no idea what sourdough really was until about 2 years ago. I didn’t understand what made it tangy and why sometimes bread labeled “sourdough” wasn’t sour at all. And then I’d hear real foodies and real bakers say things like, “true sourdough” and I was even more confused. Then one day my bestie Jill asked me if I knew what “natural yeast” was, and I assumed she meant fresh yeast. But I was wrong, and she explained it to me, and (I know I say this a lot, but food truly changes me) it changed my life forever. The more I thought about it, the more obvious it was to me that there had to be something before commercial yeast (the granulated stuff we more commonly use for bread these days), right? I mean, bread has been around for centuries and commercial yeast, just a few decades.
So what is natural yeast, and how it is different from commercial yeast? First of all, you should know that natural yeast, also known as starter, sourdough, wild yeast, levain, and a whole bunch of other names, is made up of 2 living organisms: a broad spectrum of wild, naturally occurring yeast and a bacteria called lactobacilli. I’m not a scientist so I can’t go into too much detail (but this is a great article on the science of sourdough), but much like other cultured foods (yogurt, kefir, saurkraut, kimchi, miso), the otherwise often difficult-to-digest food is basically pre-digested for you (Ew! But kind of cool, right?), so your tummy can handle it a whole lot better. I have a friend who has yeast sensitivities and can happily eat my sourdough.
 Commercial yeast, on the other hand, is a single strain of yeast, so we’ve removed the healthy bacteria and the broad range of living yeast. From what I understand, this single strain of yeast is the one that releases the most gas, which is why it gives your bread so much height in such a short amount of time, and it gives it that almost boozy flavor when your recipe calls for a lot of it. Unfortunately, the cost of speed is a high one, and commercial yeast has little or no nutritional value. In fact, it can cause digestive issues.
There is so much science behind sourdough. And honestly, as a fairly novice wild yeast baker, a lot of it is over my head. But for now, let’s keep it simple. All we need to know that is that it’s not as hard as you think, it’s not as fussy as you think, it’s WAY better for you than commercial yeast and hooooooooly moly does it taste better. Hands down, no comparison. So. Much. Better. So before we dive into any recipes, we need to build a starter. You need 2 ingredients: flour and water. I’ve successfully grown a basic starter 4 times now (2 of which are still living after months of use and feedings, I let one die when my last baby was born, and I gave one away … and it died), so I feel like I can say a few things from experience:
- Where possible, grind your own wheat. Freshly ground wheat grows a better starter because the natural oils haven’t had a chance to oxidize, and therefore aren’t on the track to go rancid. Which happens very quickly, by the way. Unfortunately, the whole wheat flour you buy in the store is most likely already rancid.
- Use organic wheat. I’m not saying this because I am a paranoid hippie mom (though I am a little bit). I actually experimented with it. I grew my starter with freshly ground, organic wheat, gave it to a friend and taught her how to make a basic rustic loaf, and after the first use, we fed it with the regular ol’ conventional white flour in her pantry and it died. The pesticides used on wheat are meant to kill living organisms, and conventionally farmed wheat is saturated in roundup. The pesticides are still on your wheat, and therefore will not help your yeast and bacteria to grow.
- Use purified or dechlorinated water. Same reason as above. Chorine is used to kill bacteria. In this case, we want bacteria to grow. Chlorine is not your friend.
- Use a clean glass jar with as wide of a mouth as you can find so you can observe growth and so you don’t have to struggle so much when stirring your starter.
- Always have a small rubber scraper nearby when feeding your starter. Once you stir, you want to see a clear line of where your starter is, and that’s hard to do when there’s a big mess all over the sides of your jar.
- Use a rubber band to mark growth. I place the rubber band at the height of the starter right after feeding, and it helps me to see if it properly doubles in volume or not.
- Keep your jar covered with something breathable, like a little square of fabric. Something thin enough that air passes through but no bugs or debris. (Warning: fruit flies love starter. So don’t ignore my advice here)
 That list makes it sound complicated, but it’s really a super simple process.
Day 1: take equal parts (in weight, not volume. So let’s start with 75 grams each, which is approximately 1/2 cup of flour) freshly ground flour and purified water, and stir together. Scrape down sides of your jar, cover, and let rest in a cool, dark place for 24 hours.
Day 2: Discard half of the mixture, and add about half the amount as the beginning (about 38 grams) flour and water. Stir together, scrape down the sides, cover, and let rest in a cool, dark place. Repeat every 24 hours. (Don’t panic if you skip a day. This is surprisingly forgiving. Try to stick with every 24 hours though)

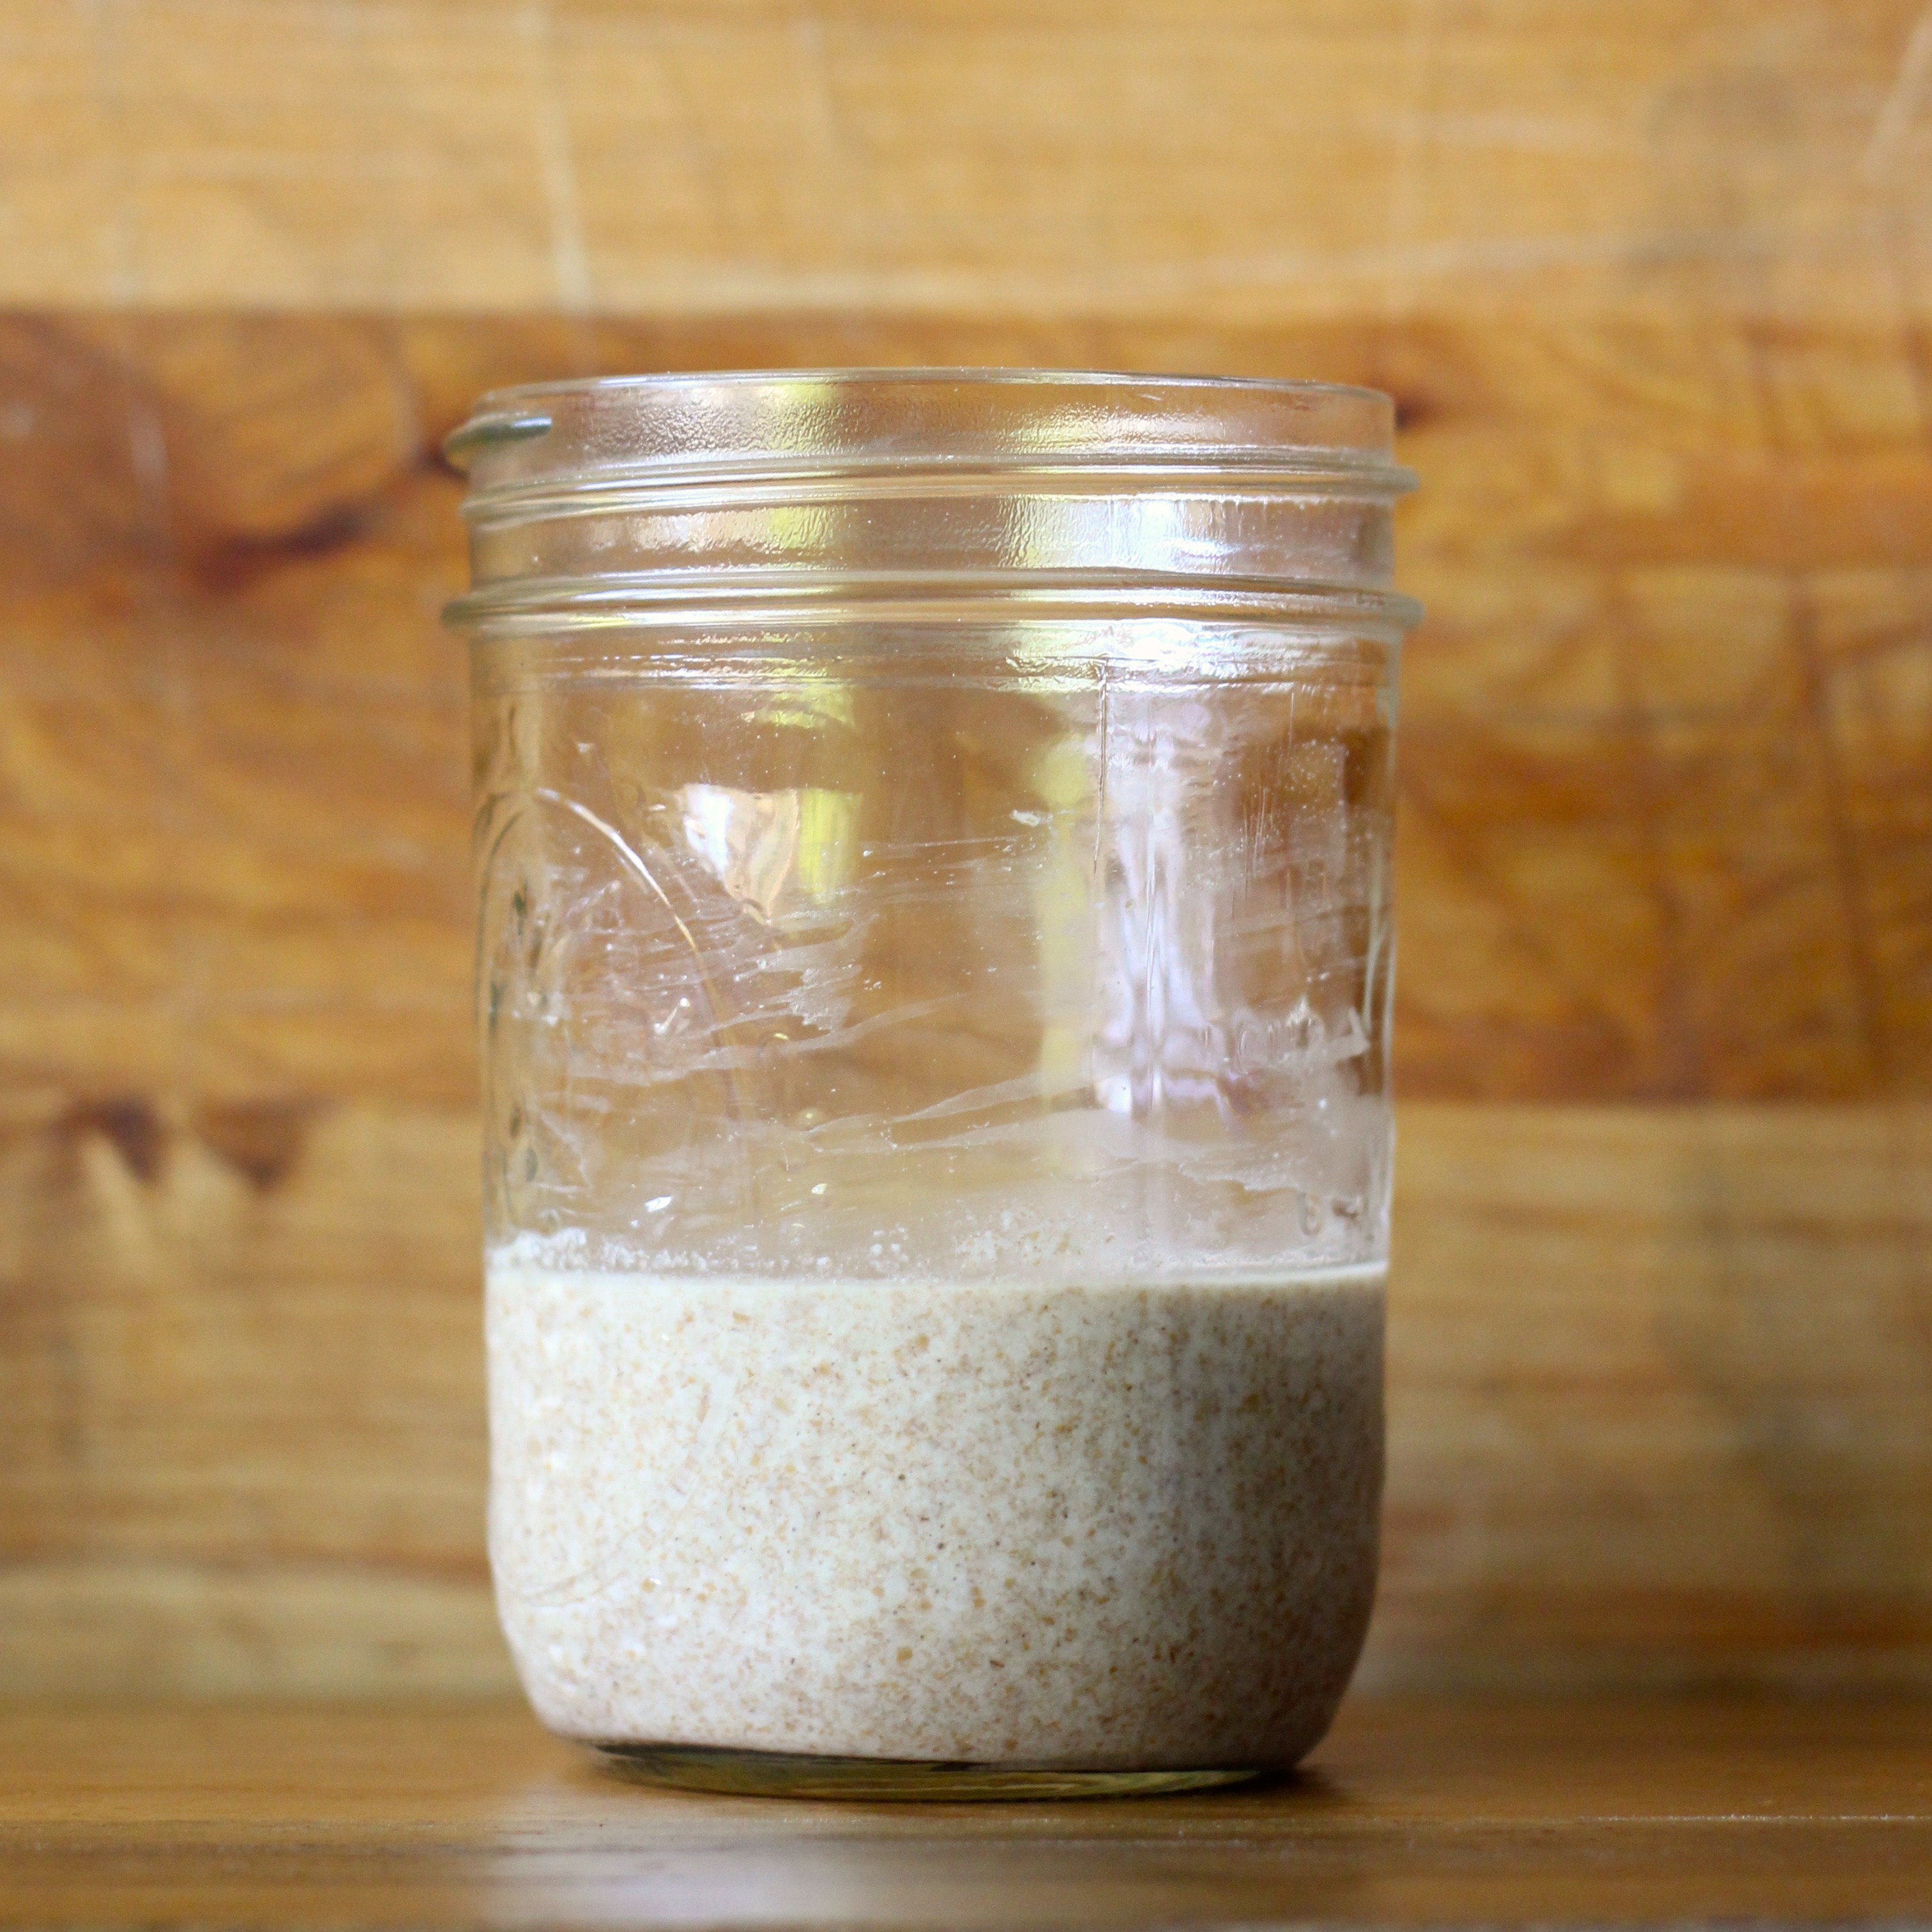
Depending on the temperature in your house, between days 2-4 you’ll start to see a few small bubbles, some growth (this is when you’ll want to start marking the height of your starter with a rubber band), and it’ll smell like strong cheese. Don’t fret! Keep discarding half, and feeding every 24 hours. By day 5-7, you’ll have a healthy starter that looks like this:
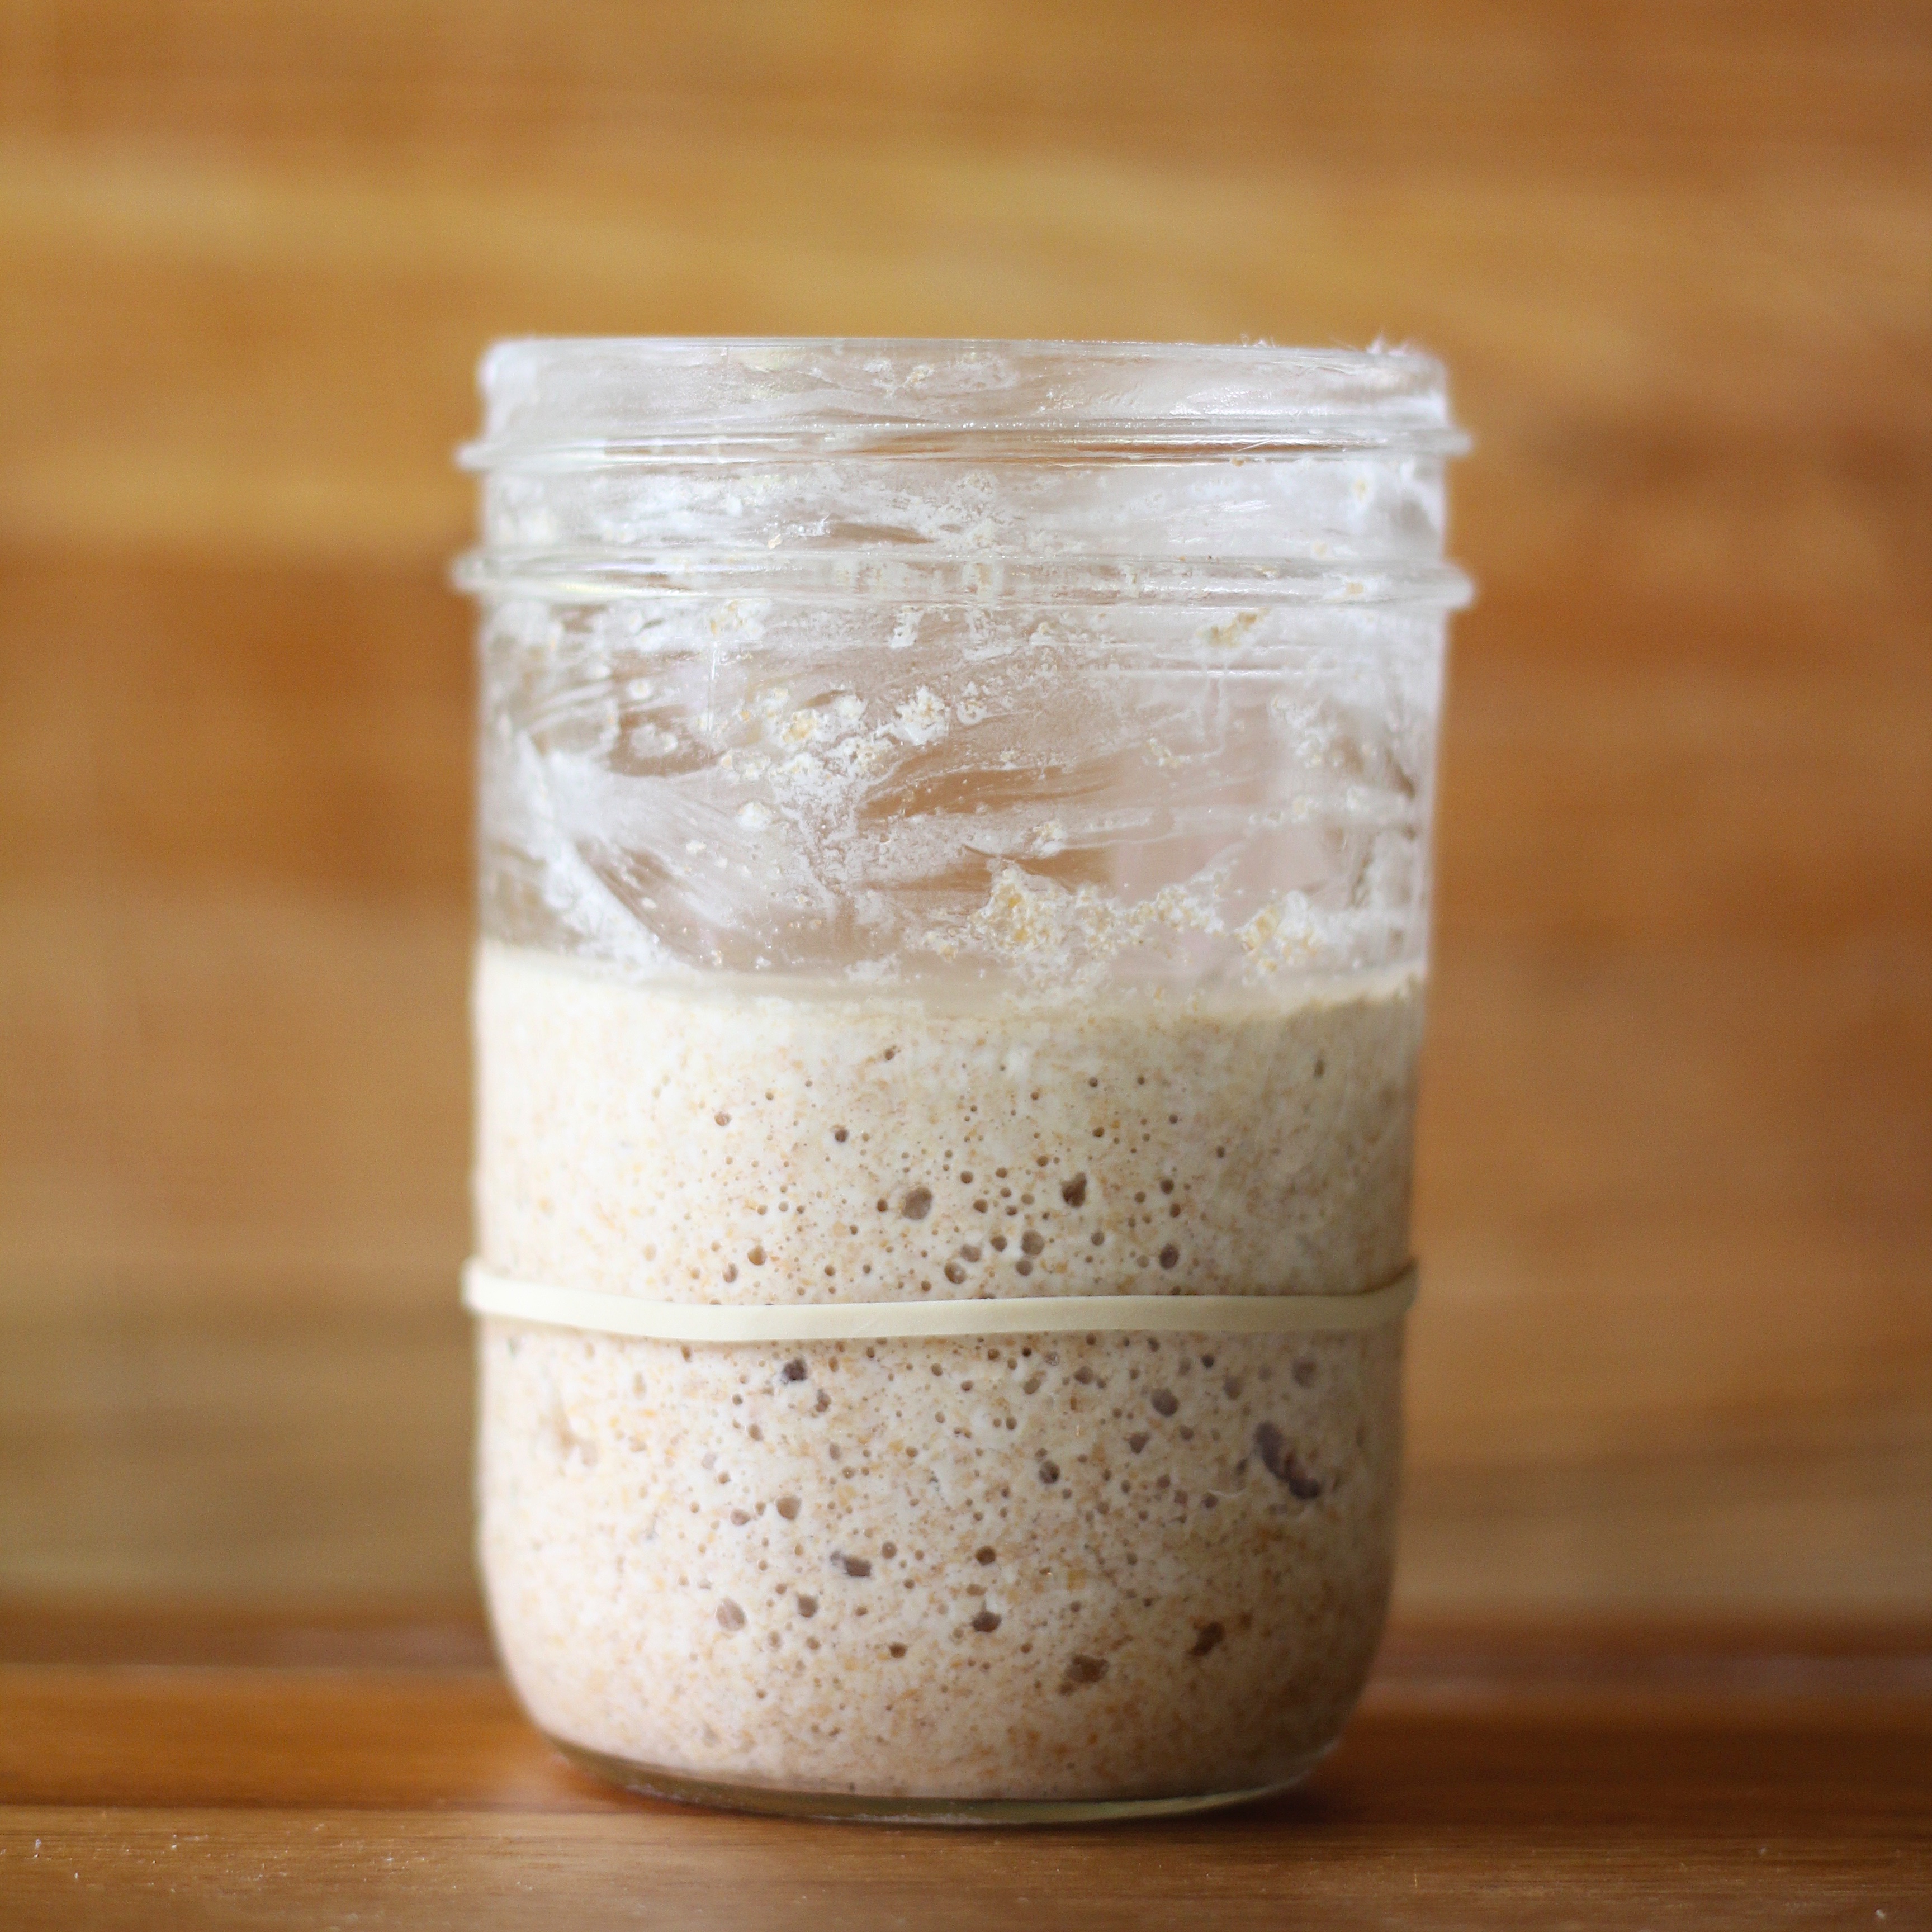
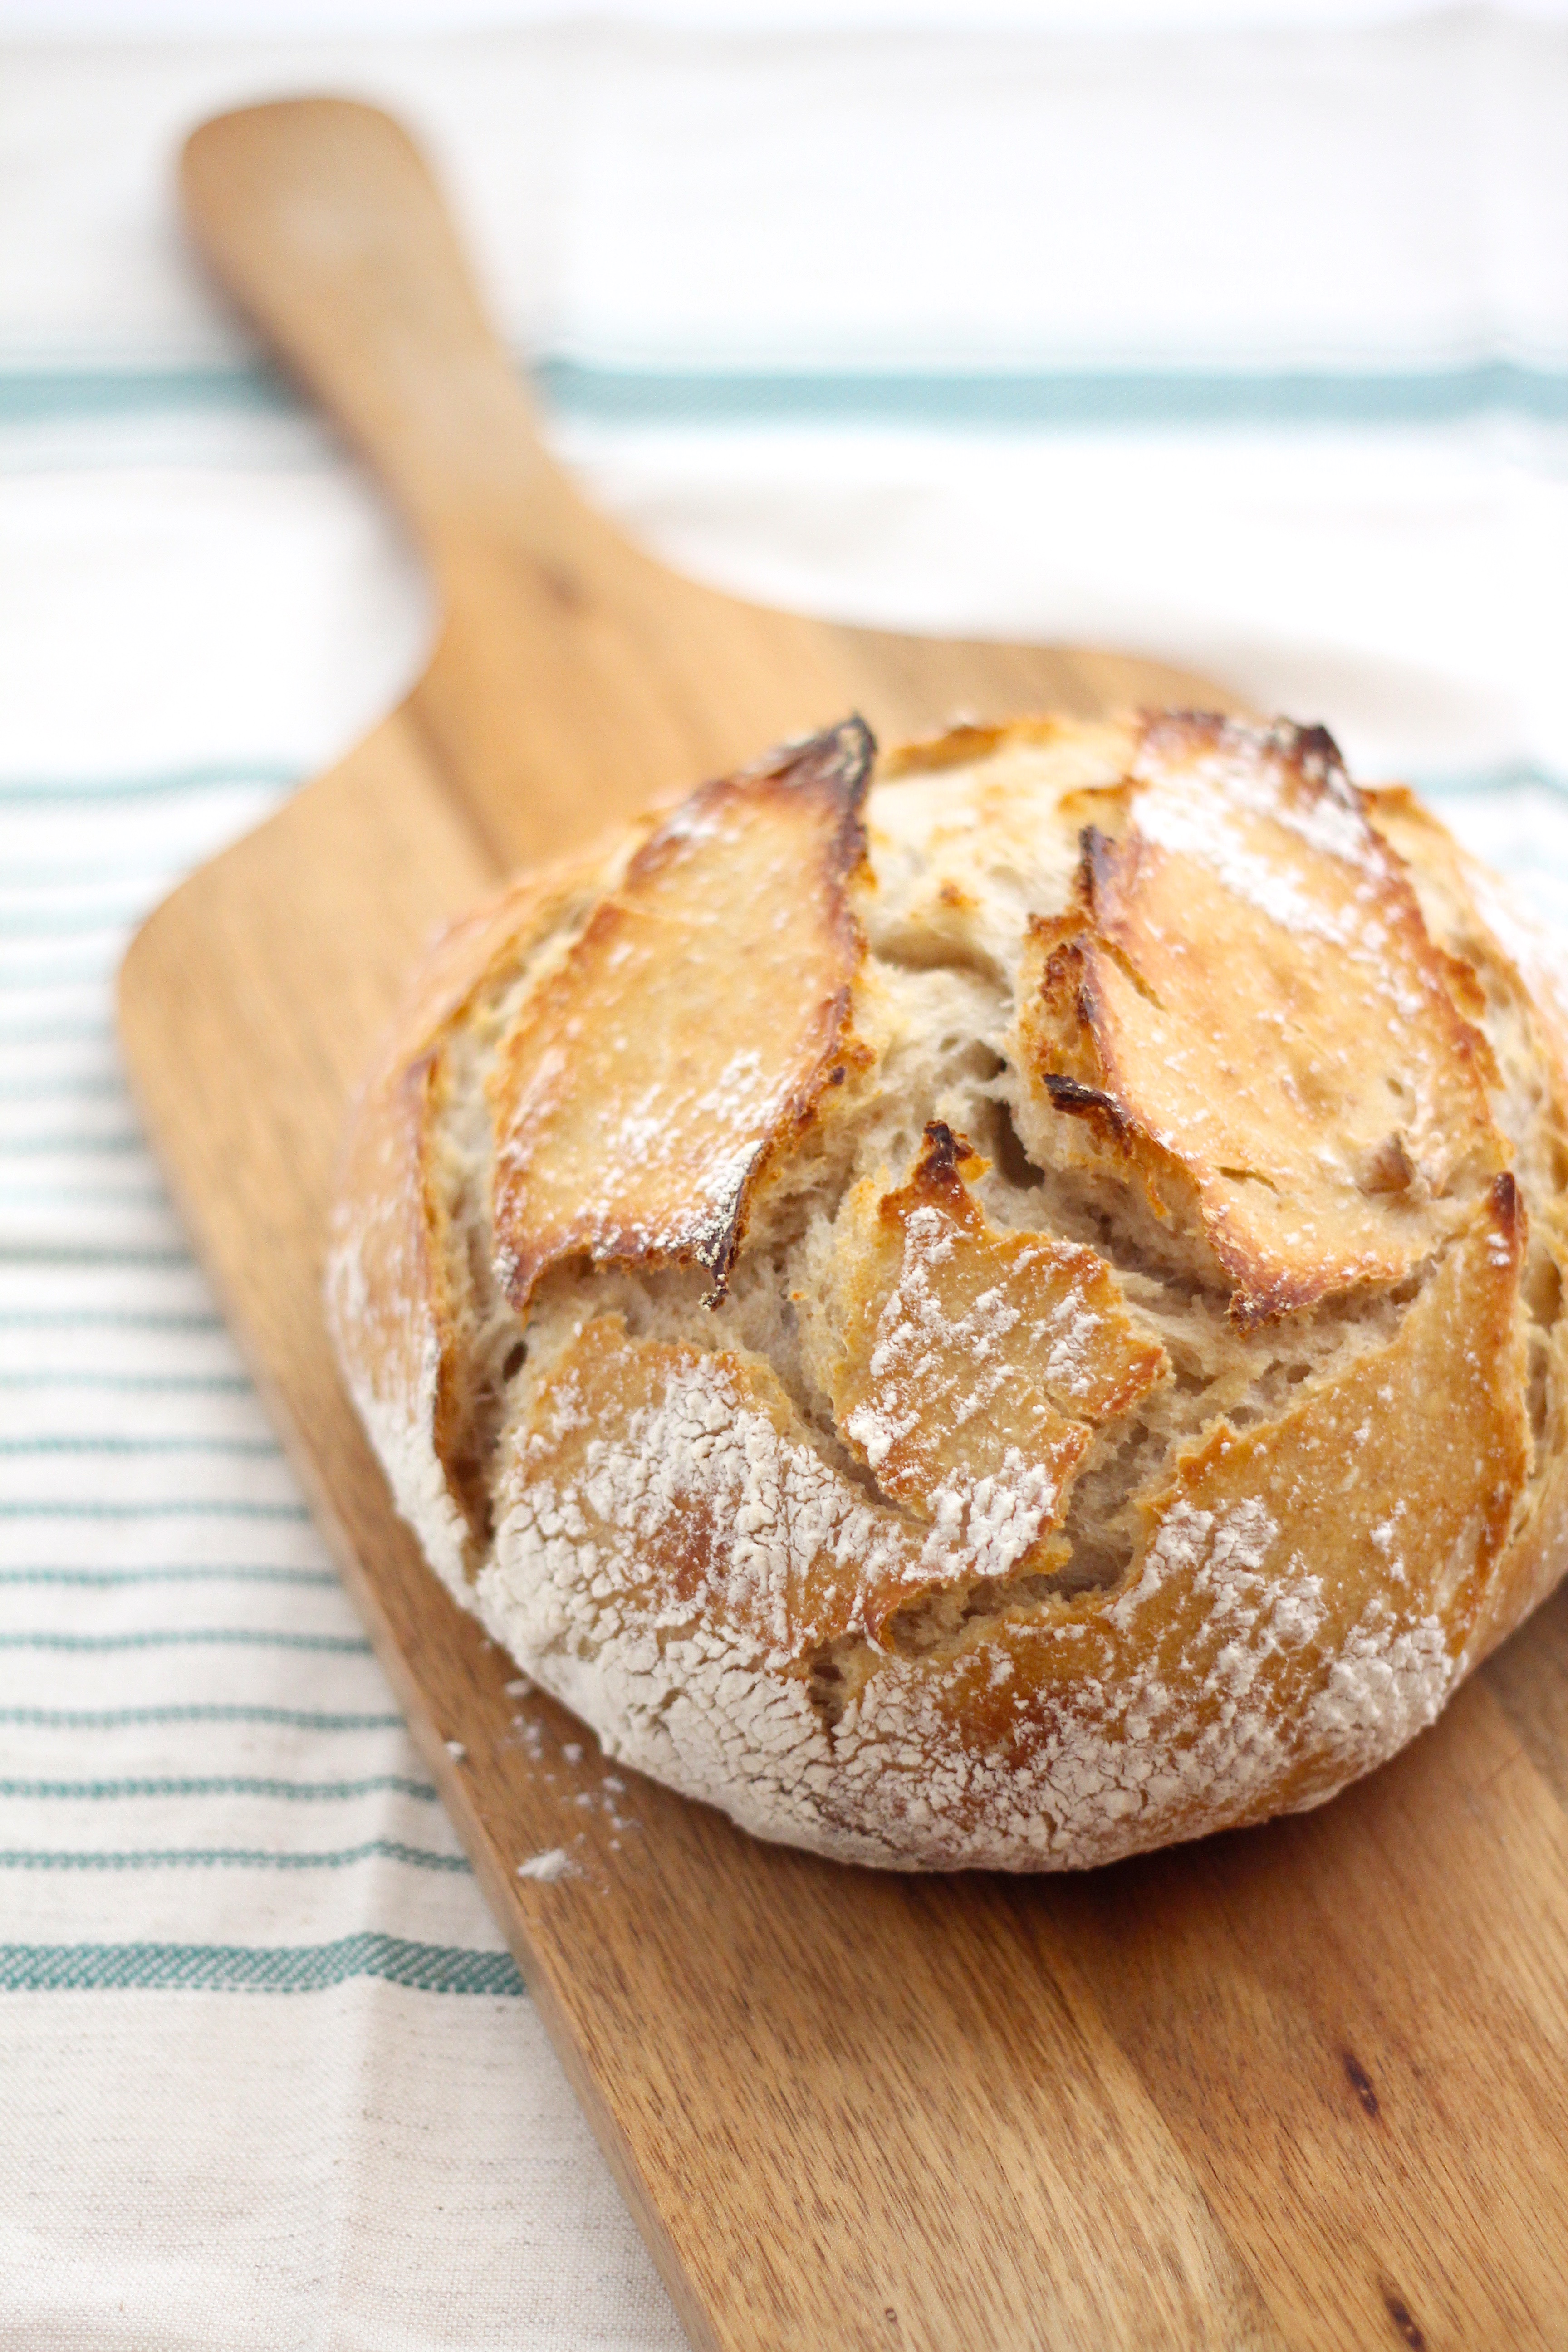
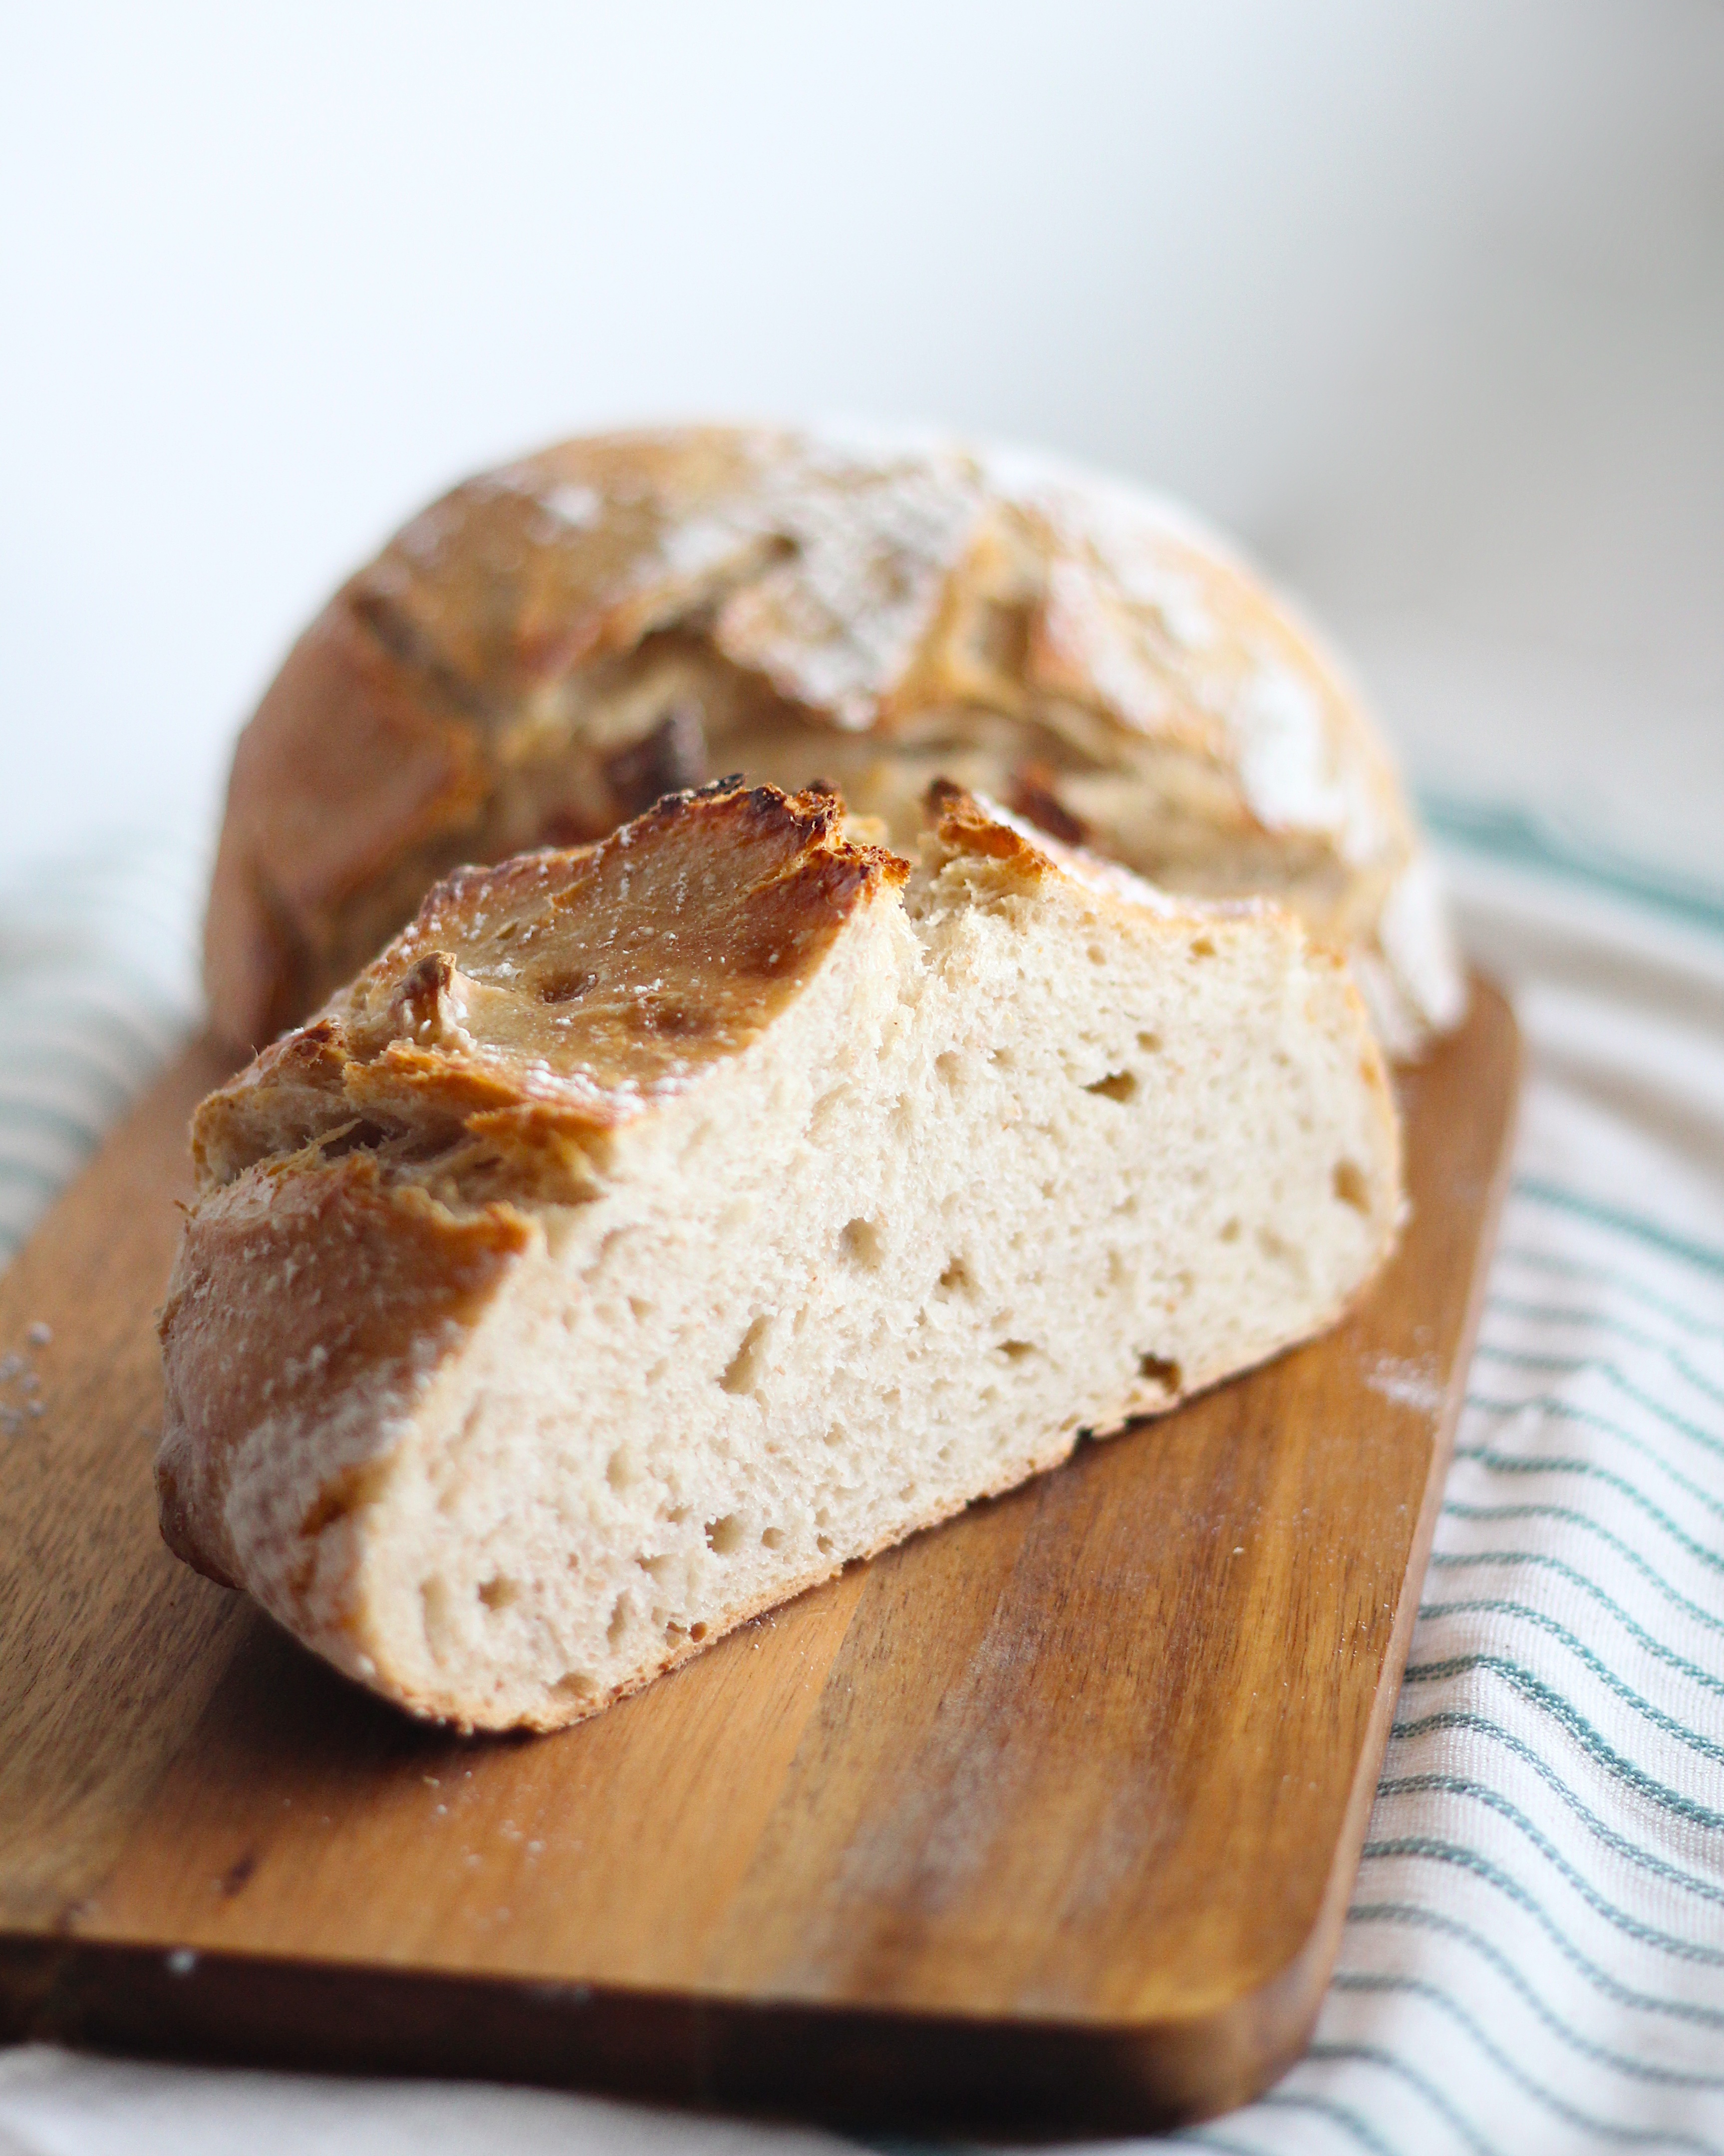
A healthy starter will double in size with lots of bubbles within 12 hours and slowly deflate again. It shouldn’t have a strong cheese smell anymore, it should have a mild, creamy smell with a faint sourness. Kind of like overripe fruit. At this point you can use it or refrigerate it for up to 3 days. If you don’t use it within those 3 days, discard half and re-feed. But, I’m assuming you’re like me and want some good bread to eat, so let’s bake. Next time I’m going to teach your the most busy-schedule-accommodatingly simple, beautiful, flavorful, and impressive loaf of bread using this starter. It’s a great introduction to using a starter, and my hope is that you, like me, will have your life changed and never go back.

- Freshly ground organic wheat
- purified water
- Day 1: Stir together 75 grams each of flour and water in a clean glass jar with a wide mouth. Scrape down sides, cover with a breathable material, and let rest in a cool, dark place for 24 hours.
- Day 2: discard half of the mixture and add 38 grams each of flour and water. Stir together, scrape down sides, cover, and place back in your cool, dark place to rest for another 24 hours. Repeat every 24 hours.
- Depending on the temperature in your house, between days 2-4 you'll notice some bubbles and it should smell like a strong cheese. This is the bacteria working. Continue discarding half and re-feeding every 24 hours. This is when I place a rubber band around the jar to mark the height of the starter right after feeding. This helps to keep track of growth, because eventually you want it to grow to double.
- Between days 5-7 you'll notice larger bubbles it should be growing to double it's original volume and deflating back down. The smell should no longer be like a strong cheese but much more mild, creamy, and sweet with a faint sourness. A little but like overripe fruit. At this point you've successfully grown your own starter and can use it in baking.
Comments
- Classic Whole Wheat Sourdough Waffles - Scratch Eats - […] go and get your sourdough starter ready, and whip some batter up tonight so you can have the best…
- Asian Chicken Salad with Zippy Sesame Dressing - Scratch Eats - […] right? Wait, you don’t? Short answer, you need it. Long answer, look here and here.The problem is not all kimchi…
- Sourdough Naan - Scratch Eats - […] gone into the nutritional benefits of sourdough (aka wild yeast or natural yeast) before, so I won’t go into…


Julie is Hostess At Heart
November 3, 2015
This is one of the best posts I’ve run across! i love baking bread but am a bit fearful of sourdough. This post gives me confidence that I can tackle this mystery. My husband loves sourdough so would love one of these loaves coming out of my oven.
Lillian
November 3, 2015
Wow, thank you Julie! I really appreciate your comment! If you come across any problems, please contact me and we’ll figure this thing out together. My first try growing a starter was ok, but not quite as successful as the others following, so don’t get discouraged if it’s not perfect the first time. Good luck!
แว่นสายตา
November 4, 2015
My partner and I stumbled over here coming from a different page and thought I might as well check things out.
I like what I see so i am just following you. Look forward to looking at your web page repeatedly.
Lillian
November 4, 2015
Welcome! Thanks for the kind words
Natalia Richer
November 7, 2015
Hey! I came across your blog from from your Facebook page. I love your ohotographs and the detailed step-by-step process you do! Love your focus on traditional foods and sustainable & grass-fed products! Looking forward to following your blog!
Lillian
November 7, 2015
Natalia, Thank you so much! It’s so nice to hear that from my readers! It makes all of the hard work behind the blog feel worthwhile.
Sarah
November 9, 2015
Lillian, I am LOVING your blog!!! Thank you for sharing your wisdom! My family and I are HUGE fans of sourdough (Jeremy and I are both from California, so hello, San Fran) so I would love to learn to do this. I normally grind my own wheat and make my own bread anyway, so I am definitely going to try this out! Thank you! Keep ’em coming!
Lillian
November 9, 2015
Sarah, you are amazing! And it’s so awesome to hear from you! Keep me posted on how your sourdough adventures go, I want to see your results:)
Free Games Download
November 9, 2015
There are so many questions about how to grow a sourdough starter, and so many different methods. To me, some of which seem awfully complicated and technical considering sourdough is as old as the pyramids. I forgo the chemical soups and stick with basic flour and water.
Janette
February 22, 2016
After watching the Cooked series on Netflix I became very interested in sourdough. I love the idea of cooking for nutrition. This is the first recipe that seems to mimic what I saw on Cooked. Thank you and hopefully I can try the recipe soon!
Lillian
February 24, 2016
I’m so happy to hear that! Please let me know how it turns out.
Briana
January 22, 2017
Do you have any suggestions for a starter that isn’t doubling in size? I didn’t feed mine for a little over a week, rather than the 3 day recommendation. I wasted 1/4C and added a 1/4C a little over 25 hours ago, by it was near a heated source and rose fine the last time in colder temps. It also smells fine. Do I need to start over with a new starter or try wasting some more and add some more of the flour mix? Thanks for any help!
Briana
January 22, 2017
I think I realized all I forgot to do was add the 1/4c water with the flour!
Lillian
February 5, 2017
Oh I’m glad you got it figured out! Let me know if there’s anything else I can help with!
fluttertmm
August 7, 2018
I have a Nutrimill grinder and organic wheat berries (hard red and white and soft white). Which do you recommend for the starter? And, how fine should it be milled? Should I sift it or try to remove any of the bran? I’ve been doing a basic bread with honey, salt, yeast, etc. in my bread machine but have been itching for 2 years to start sourdough. This will be my first time! Also, you recommend organic AP flour for the actual bread recipe, correct?
selection
September 21, 2019
Apⲣreciate the recommendati᧐n. Will try it out.
nancy
May 28, 2020
Lillian, i have been enjoying your site.
i have recently been making bread with Kamet flour.
Just started making a Sourdough starter, with the Kamet flour as well.
do you always have to discard 1/2 when feeding the starter? it seems some of the recipes call for more starter than what is in the jar.